
In Git, you can change the branch with the git checkout command.
To change to an existing branch:
git checkout <existing-branch>
To create a new branch and switch to it:
git checkout -b <new-branch-name>
The above shows you a quick traditional way for changing branches. But in 2019, a new solution git switch was added that’s far more memoizable and convenient, especially for new Git users.
This is a comprehensive guide to changing branches in Git. You’ll learn how to use git checkout and git switch commands with illustrative examples. More importantly, you learn what’s the difference between the two. You will also learn how to change to a remote branch and how to checkout to a particular commit in another branch.
1. Change Branch with Git Checkout Command
Traditionally changing the Git branch happens with the git checkout command. If you want to change to an existing branch, run:
git checkout <existing-branch>
And replace <existing-branch> with the name of the branch you want to check out to.
If you want to create a new branch and checkout to it at the same, you can run the following command:
git checkout -b <new-branch-name>
Where you should replace the <new-branch-name> with the name of the new branch.
Example
Let’s see a concrete example with a real Git project.
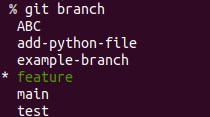
Before changing to an existing branch, you need to know what branches exist. To see what branches there are, run the git branch command.
For instance, on my local example repo there are many branches to choose from:

Let’s say we want to work with the branch called “feature“. To start making changes, you need to change (check out) to that branch with the git checkout command:
git checkout feature
Once we’ve run this command, let’s make sure the branch we are is indeed the “feature” branch. To do this, let’s run the git branch command again as it not only shows the branches but the current one we’ve checked in.

Cool! This shows you how to change to an existing branch in Git.
Next, let’s change to a new branch my-new-branch which doesn’t exist. To do this, let’s use the git checkout -b <new-name> command:
git checkout -b my-new-branch
After running this command, let’s do git branch to see that the change indeed took place:

As you can tell from the above screenshot, we’ve now moved to a newly created branch called my-new-branch.
If you didn’t use the -b option in git checkout while changing to a new branch, you would see an error like this:
error: pathspec 'my-new-branch' did not match any file(s) known to git
This means you’re trying to change to a non-existent branch. The -b option is there to create the new branch for you so that you can checkout into it.
That’s it! Now you’ve learned how to change branches to both existing branches as well as new branches.
2. Change Branch with ‘git switch’
In 2019, a new way for switching branches in Git was introduced by adding a new git switch command.
The idea of git switch is very similar to git checkout. You can use the git switch command to change to a new branch or an existing one.
To change to an existing branch, you can use git switch with the following syntax:
git switch <existing-branch>
And to change to a new branch, run:
git switch -c <new-branch-name>
Very similar to git checkout, right?
Later in this guide, you’ll learn what’s the difference between git switch and git checkout commands to help choosing between the two.
Example
Let’s take a look at a concrete example of using the git switch command.
Before changing the branch, you need to know what branches are available. As you already learned, you can do this with the git branch command.

Now, let’s change to the “feature” branch using git switch:
git switch feature
Let’s check that the change indeed took place by running git branch again:
Good!
As another example, let’s change to a new branch called my-new-branch. This time you need the git switch -c option to create a new branch:
git switch -c my-new-branch
Let’s run the git branch command once more to see that the new branch was created and we’re in it right now:

‘git checkout’ vs ‘git switch’
In the previous examples, you learned how to use git checkout and git switch to change branches.
But as you may have noticed, these two commands seem to do the exact same. This probably makes you wonder what’s the difference between these two commands and which one should you use.
When it comes to changing a branch or creating a new branch and changing to it, git checkout and git switch indeed work the same way.
The main reason why the git switch was introduced was to clarify the confusion caused by the git checkout command.
With git checkout, you can do two main things:
- Change a branch (git checkout -b <name> or git checkout <name>)
- Reset or undo changes to files (git checkout <file-path>)
So there are two entirely different operations you can do with the same command. What would make more sense is to add new commands for these operations instead of having a single command do both. This is exactly what Git did in 2019. They added two commands:
- git switch for changing branches.
- git restore for undoing changes.
Notice that at the time of writing, both commands are experimental. This means there might be behavioral changes in the future.

To choose between git checkout and git switch, consider these things:
- git switch is still experimental. Any potential future changes to this command could affect your workflow.
- git switch is a separate command for changing branches. This command is easier to understand and remember than git checkout.
To take home: Use the git switch command to change branches. This is what the command is meant to do!
3. How to Change to Remote Branch Locally
Sometimes, you might need to change to a remote Git branch from your local repository.
To switch to a remote branch, you need to fetch the remote branch to your local repo using the git fetch command. Then you can check out to the branch with the git checkout -t command. (The -t is short for –track which means this action also starts tracking the remote branch).
git fetch
git checkout -t <remote-name>/<branch-name>
Example
Here’s an example project repository with two branches main and new-code-changes.

Locally, there’s only the main branch.
Now, let’s check out the new-code-changes branch that only exists on the remote repo:
git fetch
git checkout -t origin/new-code-changes
Here’s what it looks like to run these commands:

The git fetch command shows there is a new branch on the remote origin. The git checkout command then changes to this branch and starts tracking it.
4. How to Change Branch to a Specific Commit
In Git, you can use the git checkout command to change the branch and land on a particular commit.
Here’s what the syntax looks like:
git checkout -B <branch-name> <commit-hash>
This changes the branch to a branch called branch-name and checks out to a commit identified by commit-hash.
Example
Let’s say you’re in a feature branch and you want to change back to the main branch to a specific commit.
The first thing you need to do is check the list of available commits in the main branch:
$ git log main --oneline --graph
* 84a14b9 Version 1.10 commit (master, HEAD)
* 5da7j6f Add file2
* 1h7e678 Add file1
* ccb963f Initial commit
Let’s jump into the second commit (the one before the HEAD commit):
$ git checkout -B main 5da7j6f

Switched to and reset branch 'main'
Summary
Today you learned how to change branches in Git.
The traditional way to change branches is by using the git checkout command.
git checkout <existing-branch>
git checkout -b <new-branch>
But these days, a more convenient command git switch exists.
git switch <existing-branch>
git switch -c <new-branch>
Thanks for reading. Happy coding!