
In JavaScript, you can use a for loop to repeat a task based on a condition.
As long as the condition is true, the looping continues. When the condition becomes false, the loop terminates.
For example, let’s display numbers from 0 to 5 using a for loop:
for(let i = 0; i <= 5; i+=1) {
    console.log(i)
}
Output:
0
1
2
3
4
5
In this particular for loop, the condition is i <=5.
In other words, if i is less than or equal to 5, we continue displaying values and increasing the value of i by 1.
In this guide, you learn everything you need to know about the for loops in JavaScript.
This includes:
- For loop syntax
- Examples
- Alternatives
And much more.
For Loops Explained in JavaScript
In JavaScript, a for loop makes it possible to repeat code as long as a condition is met.
One application of a for loop is to iterate over a collection of values.
In JavaScript, you can store values in iterable collections, such as arrays.
Given an array of values, you commonly want to go through them one by one.
Doing this manually would be a waste of time.
This is where a for loop can be used.
You can use a for loop to go through an iterable, such as an array, element by element from start to finish.
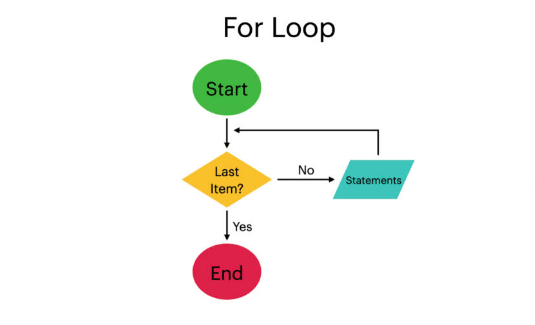
Here is an illustration of a for loop:
To learn how to create a for loop, you need to understand its syntax first.
Syntax
for(initialization; condition; lastExpression) {
    // code
}
Where:
- initialization runs before the execution of the first loop statement inside the loop.
- condition is checked each time before jumping into the next iteration of the loop. The loop continues if the condition evaluates true. If the condition evaluates false, the loop terminates.
- lastExpression is executed after each iteration. This expression eventually updates the condition and causes the loop to end.
- // code represents the area (block) in which you can place any valid JavaScript code.
Examples
Now that you understand the syntax of a for loop, let’s see some examples of using one.
Show Numbers from 1 to 10
Let’s use a for loop to log values from 1 to 10 one by one.
Here is how it looks in the code:
for (let i = 1; i <= 10; i += 1) {
    console.log(i)
}
Output:
1
2
3
4
5
6
7
8
9
10
To support understanding, let’s take a close look at the for loop and compare it to the for loop syntax in the previous chapter:
- The initialization is let i = 1; This creates a variable called i with the value of 1. So when the loop starts, the value of i starts at 1.
- The condition is i <= 10 or “variable i is less than or equal to 10″. The variable i is 1 so this is true. As the loop progresses, this is checked each time before jumping into the loop statements.
- The lastExpression is i += 1. This is a shorthand for saying i = i + 1. In other words, this increments the value of i by one in each iteration.
Inside the loop, we have a simple expression console.log(i).
This displays whatever is the current value of the variable i as long as it is less than or equal to 10.
Next, let’s see an example of using a for loop to access the values of an array.
Iterate Over an Array
As stated earlier, you can use a for loop to iterate over collections of values, such as an array.
In this example, you learn how to iterate over an array of strings.
To loop through an array, you need to be careful.
As you probably already know, accessing an array element happens with an index. If this index is out of the reach of the array, you are going to get an error.
If you try to access the 6th element of an array of 5 values, your program will crash.
Thus, you need to be careful when formulating a for loop to iterate over an array.
To loop through an array with a for loop, follow these three steps:
- Initialize a looping variable at 0 (the 1st element).
- Loop the array as long as the looping variable is less than the length of the array.
- Increment the looping parameter by 1 during each iteration.
Here is an example:
const names = ["Alice", "Bob", "Charlie"]

for(let i = 0; i < names.length; i += 1) {
    console.log(names[i])
}
Output:
Alice
Bob
Charlie
Next, let’s take a look at a for loop with multiple conditions.
For Loop with Multiple Conditions
Previously, you saw examples where the looping condition is simple.
However, the condition can be something more complex as long as it evaluates true or false.
A common example is when you have multiple looping conditions chained together with logical operators.
For example, let’s create a loop that finds a target number given an array of numbers:
let found = false
let target = 13
const numbers = [1, 5, 13, 8, 12, 176]

for(let i = 0; !found && i < numbers.length; i += 1) {
    console.log("Inspecting number " + numbers[i])
    if (numbers[i] === target) {
        console.log("Target found!")
        found = true
    }
}
Output:
Inspecting number 1
Inspecting number 5
Inspecting number 13
Target found!
In this loop, the condition consists of two parts:
- The number is not found yet.
- The index does not exceed the bounds of the array.
If both of these conditions are true, the looping continues.
Next, let’s focus on controlling the flow of for loops in JavaScript by examining the control flow statements continue and break.
Control Flow Statements (break and continue)
In JavaScript, you can control the flow of a loop.
With control flow statements, it is possible to terminate the current iteration of a loop. You can also use control flow statements to exit the entire loop.
There are two control flow statements in JavaScript:
- continue. This ends the current iteration and jumps to the next one.
- break. This ends the whole loop.
Let’s have a closer look at these statements.
continue
In JavaScript, you can use the continue statement to jump out of the current iteration of a for loop.
This is useful if the loop consists of code that does not need to be executed every time.
The continue statement allows you to skip “the rest of the code” in the loop.
For example, given an array of numbers, let’s use a for loop to show info on each number. More specifically, let’s display whether the number is odd or even.
Here is an example implementation:
const numbers = [1, 2, 3, 4, 5, 6, 7, 8, 9, 10]

for (let number of numbers) {
    if (number % 2 == 0) {
        console.log("Even number " + number)
        continue
    }
    console.log("Odd number " + number)
}
Output:
Odd number 1
Even number 2
Odd number 3
Even number 4
Odd number 5
Even number 6
Odd number 7
Even number 8
Odd number 9
Even number 10
In this piece of code, we use the continue statement to jump out of the current iteration if the number is even.
This is because we do not want to print the “Odd number” at the end of each iteration.
Without the continue statement, this code would always print both “Even number” and “Odd number”.
Now the continue statement prevents the execution of the last line in the for loop.
To take home, you can use the continue statement to skip the rest of a loop.
Next, let’s take a look at a more aggressive control flow statement, break.
break
In JavaScript, you can use the break statement to jump out of a loop altogether.
When the break statement is used, the loop terminates instantly.
This is useful if you want to save resources and stop looping after some condition is met.
For example, given a target number and a list of numbers, let’s build a for loop to find the target:
const target = 23
const numbers = [1, 23, 4, 2, 7, 19]

for (let number of numbers) {
    console.log("Checking number " + number + "...")
    if (number === target) {
        console.log("Target found!")
        break
    }
}
Output:
Checking number 1...
Checking number 23...
Target found!
We used the break statement to escape the loop right when the target number was found.
This is good because it would not make any sense to continue searching the numbers after finding what we were looking for.
To take home, use the break statement to save resources and early exit a loop.
Next, let’s take a look at a situation in which you can omit curly brackets in a for loop.
Should You Omit Curly Brackets with For Loops?
If you have a single-line expression in a for loop, you do not need to use curly brackets.
By the way, this is not a for-loop-specific thing. It generally applies to all the other types of code blocks too.
I’m bringing this up because it can sometimes cause confusion.
For example, given an array of names, let’s use a for loop to print the names to the console:
const names = ["Alice", "Bob", "Charlie"]

for(let i = 0; i < names.length; i += 1)
    console.log(names[i])
Output:
Alice
Bob
Charlie
As you can see, the console logging statement was not wrapped around curly brackets.
This is because it is a single line of code and the JavaScript parser knows it belongs to the loop.
Now let’s see what happens if we try to do this with multiple expressions inside the loop.
For example:
const names = ["Alice", "Bob", "Charlie"]

for (let name of names)
    console.log(name)
    console.log("--------")
Output:
Alice
Bob
Charlie
--------
This does not work as expected.
You would expect to see a dashed line after each name.
Instead, you get a single dashed line after the very last element.
This is because the loop treats the last expression as being outside of the loop.
This way omitting the curly brackets caused confusion.
Thus, it is recommended to use curly brackets around for loops (and other blocks of code) to avoid confusion and silly mistakes.
Now you have a solid understanding of for loops in JavaScript.
Next, let’s take a look at some alternatives to the for loop.
Essentially, you are going to learn all the other types of loops in JavaScript.
For Loop Alternatives
Although this is a for-loop guide, it is worthwhile to pay attention to alternative approaches.
Sometimes these alternatives better fit your needs.
There are 3 main types of loops in JavaScript:
- For loops
- While loops
- Do-While loops
In addition to these, there are 2 variations of a for loop for looping through iterables:
When it comes to looping over an array, you can also use Array.forEach() method instead of a for loop.
In total, there are 5 alternatives that you may want to consider when writing a regular for loop.
Next, you are going to learn how each of these alternatives works.
While-Loops
A while loop is a popular loop type in JavaScript.
A while loop repeats a piece of code as long as a condition holds.
Here is an illustration of a while loop:

The idea of the while loop is similar to a for loop but the syntax is different.
Let’s take a look at the syntax a bit closer.
Syntax
In JavaScript, the while loop follows this syntax:
while (condition) {
    // code
}
Where:
- condition must hold for the loop to run. If the condition returns false, the loop stops.
- // code represents the block of code that is repeatedly executed in the loop. This can be any valid JavaScript code.
Unlike the for loop, a while loop does not have an explicit lastExpression that would eventually update the condition to false and stop the loop.
A while loop is thus prone to an endless loop.
An endless loop means the condition is always true and the loop continues forever.
This is not what you want and it can cause serious issues in your web app.
To avoid endless loops, you must eventually modify the condition by performing an action inside a loop.
For example, when counting values, you have to increment a counter variable at the end of each iteration.
Example
Let’s use a while loop to count to 5 and display the numbers in the console:
let i = 0
while (i <= 5) {
    console.log(i)
    i += 1
}
Output:
0
1
2
3
4
5
Here you first initialize a counter outside of the while loop.
You set the counter variable i to 0.
Then you construct a while loop where the condition says the looping must continue until the counter is more than 5.
Inside the while loop, you print the current value of the counter.
Then you also increment the counter for the next round.
If you did not update the counter at the end of the loop, you would cause an endless loop.
Next, let’s take a look at a very similar loop called the do-while loop.
Do-While Loops
The do-while loop is very similar to a while loop.
The only difference is the do-while loop always executes at least once.
If you think about a regular while loop, if the condition is false, to begin with, the loop does not execute once.
In some situations, you want the loop to run at least once no matter what.
This is why there is a special variation of a while loop called the do-while loop.
Let’s start by looking at the syntax of the do-while loop.
Syntax
In JavaScript, the do-while loop follows this syntax:
do {
   // code
} while (condition)
Where:
- // code can be any valid JavaScript code. This piece of code is always executed at least once.
- condition must hold for the loop to continue running. If the condition returns false, the loop stops.
Similar to a while loop, you must update the condition at some point to prevent an endless loop.
The characteristic difference between a while loop and a do-while loop is the order of code. In a while loop, the condition comes first and the statements follow.
In a do-while loop, the statements live inside a do-block that precedes the condition.
Example
Given an age, let’s print the age and add one year to it until the age is 20+. Furthermore, no matter what the age is, let’s print it at least once.
For example:
let age = 50

do {
    console.log(age)
    age += 1
} while (age < 20)
Output:
50
Here the age is 50, to begin with. So the condition is false right when we start looping.
But because you are using a do-while loop, the age is printed out at least once.
As another example, let’s start with a lower age:
let age = 15

do {
    console.log(age)
    age += 1
} while (age < 20)
Output:
15
16
17
18
19
Now the code prints ages 15, 16, 17, 18, and 19 and stops when the age is 20 and the condition is false.
Now you know the basic loop types in JavaScript.
These loops are commonly found in other programming languages as well.
Next, let’s take a look at two variations of the for loop:
- For-of loop
- For-in loop
For-Of Loops
A for-of loop lets you loop through an iterable in a more readable manner.
An iterable means a collection of values that can be looped through.
An array is one example of an iterable object. A string is also an iterable object.
Let’s take a look at the syntax of the for-of-loop.
Syntax
for (variable of iterable) {
    // code
}
Where:
- variable is assigned a different property during each iteration.
- iterable is an object whose properties are looped through.
To make any sense of this, you need to see an example.
Example
Given an array of strings, let’s use a for-of loop to print out each string:
const names = ["Alice", "Bob", "Charlie"]

for (let name of names) {
    console.log(name)
}
Output:
Alice
Bob
Charlie
Before each iteration, the loop assigns the next element to a variable called name. You can then use the name variable inside the loop to do whatever you want.
So far we have mainly dealt with arrays and for loops.
But as you learned, an array is not the only iterable type in JavaScript. A string is another example of an iterable data type that is commonly used.
In other words, you can use a for loop to loop through strings as well.
Let’s see how to use a for-of-loop when looping through the characters of a string.
For example:
const word = "Hello"

for (c of word) {
    console.log(c)
}
Output:
H
e
l
l
o
As you can see, the idea is the exact same as when looping through an array.
As you can see, the for-of-loop is handy as you do not need to worry about indexes or conditions.
For-In Loops
Another for-loop variant is the for-in loop, which you can use to iterate over object properties.
This is very similar to the for-of-loop from the previous chapter.
The difference between a for-in loop and a for-of loop is:
- The for-of-loop loops through elements.
- The for-in loop loops through keys.
Before jumping into examples, let’s see the syntax of a for-in loop.
Syntax
for (property in object) {
    // code
}
Where:
- variable is assigned a different property during each iteration.
- object is the JavaScript object whose properties are looped through.
Example
Given a data object, let’s iterate through its keys and print the key-value pairs to the console:
const data = {
    "Alice": 32,
    "Bob": 23,
    "Charlie": 27
}

for (let key in data) {
    console.log(key + ": " + data[key])
}
Output:
Alice: 32
Bob: 23
Charlie: 27
Here the for-in loop takes one key at a time and assigns it to a variable called key. Inside the loop, you then use this key to access the value for that key in the data object.
You should not use a for-in loop to loop through an array. This is because the for-in loop returns each element’s associated keys instead of the values.
For example:
const names = ["Alice", "Bob", "Charlie"]

for (let name in names) {
    console.log(name)
}
Output:
0
1
2
As you can see, the for-in loop does not return the string values. Instead, it returns the indexes (that is the enumerable keys related to each string in the array).
Unless this is what you want, do not use a for loop with arrays.
So far you have learned how to use all the types of loops in JavaScript.
Because looping with arrays is so common, we are going to dedicate a whole chapter to Array.forEach() method. This is a special method designed to shorten the looping of arrays.
Array.forEach() Method
A JavaScript array has a built-in forEach() method.
You can use this method to loop through the elements of an array without having to write down a for loop or a while loop.
This can make your code more concise and readable.
Anyway, here is a quick introduction to the Array.forEach() method.
Syntax
Here is the basic syntax of the forEach() method in JavaScript:
Array.forEach(elem => { /* code */ })
Where:
- elem represents one array element at a time in the loop.
- { /* code */ } is a block of code. You can place any valid JavaScript code here.
Example
Given an array of names, let’s print out each name into the console using the forEach() method.
Here is how it looks in the code:
const names = ["Alice", "Bob", "Charlie"]

names.forEach(name => {
    console.log(name)
})
Output:
Alice
Bob
Charlie
Behind the scenes, this piece of code creates a loop. It then loops through the array one element at a time and calls each element name.
This is very handy and it can usually make your code a bit shorter yet it maintains the code readability and overall quality.
Now that you have seen a bunch of ways to use loops in JavaScript, let’s put it all together.
5 Ways to Print Array Elements
Here are 5 ways to print the numbers of an array. Each approach produces the exact same result:
const numbers = [1, 2, 3]

// For Loop
for(let i = 0; i < numbers.length; i++) {
    console.log(numbers[i])
}

// For-of Loop
for (let number of numbers) {
    console.log(number)
}

// While Loop
let j = 0
while(j < numbers.length) {
    console.log(numbers[j])
    j++
}

// Do-while Loop
let k = 0
do {
    console.log(numbers[k])
    k++
} while (k < numbers.length)

// Array.forEach Loop
numbers.forEach((number) => console.log(number))
Each approach prints the numbers array this way:
1
2
3
Conclusion
Today you learned about the for loops in JavaScript.
To recap, a for loop can be used to repeat code when a condition is true.
When a condition is false, the for loop stops.
Looping in general is useful in many ways in programming.
For instance, you can have an array of values and use a loop to access one value at a time.
In JavaScript, the 3 main types of loops are:
- For loops
- While loops
- Do-While loops
In this guide, the main focus was in for loops, but you should not forget the other types of loops!
Each of these loops can be used to accomplish the same tasks with different syntax.
In addition, a do-while loop lets you always run a piece of code at least once regardless of the looping condition.
A for loop has two variants:
- For-of loops
- For-in loops
These can be used to iterate over the properties of an object in a readable and concise fashion.