
In Swift, you can use the guard statement to guard your code. The guard blocks access to critical parts of your code if a condition is not met.
The guard statement works very similarly to an if statement.
The main difference is that the guard statement is used to continue running code if a condition is not met.
For example, this piece of code continues execution if the age is 18 or more.
guard age >= 18 else { return false }
In this guide, you learn how to use the guard statement in Swift in detail.
After reading this guide, you know:
- What problem does the guard statement solve.
- How to use the guard statement.
- The difference between the guard statement and an if statement.
- Common use cases for the guard statement.
Let’s jump into it!
The Guard Statement in Swift
As the name suggests, the guard statement can be used as a security guard in your code.
The guard performs conditional checks to make sure the execution of the code can continue.
If the guard thinks the execution of the code should not continue any further, it blocks the execution.
This is very similar to how you can use an if statement in Swift.
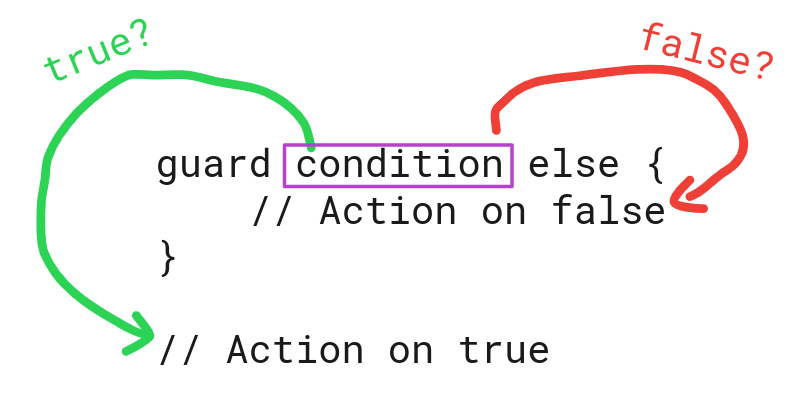
The guard statement follows this syntax:
guard condition else {
    // statements
    // return, break, continue, or throw
}
Where condition evaluates to true or false and:
- If the condition is true the guard block is not executed.
- If the condition is false the guard block gets executed.
Notice how you need to use one of the four control flow statements (return, break, continue, throw) at the end of the guard block. This is because the guard statement is used to exit from the current scope.
Let’s see an example of how you can use a guard statement.
Example: Print Even Numbers Only
To demonstrate how the guard statement works, let’s print even numbers from 0 to 10.
First, let’s use a regular if statement:
var i = 0

while (i <= 10) {
    if i % 2 == 0 {
        print(i)
    }
    i += 1
}
Output:
0
2
4
6
8
10
This code works by printing numbers only if they are divisible by 2, that is if they are even.
However, you could achieve the same behavior with the guard statement.
var i = 0

while (i <= 10) {
    guard i % 2 == 0 else {
        i += 1
        continue
    }
    print(i)
    i += 1
}
Output:
0
2
4
6
8
10
Here the guard checks if the current index is even.
If the index is even, the guard is not executed and the program flow continues to the print() function call. If the index is odd, the guard blocks printing the value.
In this case, the guard block:
- Increments the index by one.
- Terminates the current iteration of the loop using continue.
- Makes the loop start the next iteration.
This demonstrates well how the guard statement works in Swift.
By the way, this is also a great example of when you should not use the guard.
If you compare the if statement to the guard statement, you see the latter is more complex. In this case, it makes sense to use a simple if statement over a complicated guard statement.
Let’s see some common use cases for the guard statement in Swift.
Guard Let Statements in Swift
In Swift, you can use the guard to unwrap optional values.
For example:
func nameCheck() {
    var name: String? = "Alice"
    guard let myName = name else {
        print("Name is not defined")
        return
    }
    print("My name is \(myName)")
}

nameCheck()
Output:
My name is Alice
The guard statement works such that it:
- Checks if the name variable is not nil.
- If the name is not nil, the name is assigned to a new constant myName.
- If the name is nil, the guard exits the function.
This demonstrates what “early exit” means in the context of using the guard. The function is exited earlier than action can take place.
Let’s see another similar example.
In this example, we use the guard to check if a property of an object is nil.
struct User {
    let name: String?
}

func validate(user: User?) {
    guard let username = user?.name else {
        print("Invalid username")
        return
    }
    print("Welcome, \(username)")
}

let alice:     User? = User(name: "Alice")
let anonymous: User? = User(name: nil)
let nobody:    User? = nil

validate(user: alice)
validate(user: anonymous)
validate(user: nobody)
Output:
Welcome, Alice
Invalid username
Invalid username
Guard Multiple Conditions
In Swift, the guard statement lets you specify multiple conditions.
To do this, separate the conditions/expressions by a comma.
guard cond1, cond2, cond3 else {
    // actions
}
By the way, you can break the line if the conditions take too much space.
guard cond1,
      cond2,
      cond3 else {
    // actions
}
Anyway, let’s see an example.
In this example, we have a Person object that has two optional members.
Furthermore, we use the guard statement to make sure both members are not nil.
struct Person {
    let name: String?
    let age: Int?
}

func introduce(person: Person?) {
    guard let name = person?.name, let age = person?.age else {
        print("Unable to validate")
        return
    }
    print("This is \(name), \(age)")
}

let alice: Person? = Person(name: "Alice", age: 30)
introduce(person: alice)
Output:
This is Alice, 30
Guard Multiple Mixed Conditions
You already saw how to add multiple conditions in a guard statement in the previous chapter.
As you might guess, it is also possible to check both a condition and assign a let constant in the same guard statement.
For instance, let’s attach a username to a constant and make sure a maintenance mode is not on:
struct User {
    let name: String?
}

func validate(user: User?, maintenance: Bool) {
    guard let username = user?.name, maintenance == false else {
        print("Unable to validate")
        return
    }
    print("Welcome, \(username)")
}

let alice: User? = User(name: "Alice")
validate(user: alice, maintenance: true)
Output:
Unable to validate
Notice that even though it is possible to combine multiple conditions or expressions in the guard statement, usually you might want to do them separately for clarity.
For example, if your function is supposed to throw different types of errors, you should use multiple guard statements for checking the corresponding conditions.
Guard Var Statements in Swift
Similar to how you can specify a let constant in the guard-let statement, you can create a variable using var.
For instance:
struct User {
    let name: String?
}

func validate(user: User?) {
    guard var username = user?.name else {
        print("Invalid username")
        return
    }
    print("Welcome, \(username)")
}

let alice: User? = User(name: "Alice")
validate(user: alice)
Output:
Welcome, Alice
But this only makes sense if the variable is bound to change afterward.
If you are not going to change the variable over time, use let to create a constant instead.
Guard Else Throw Statement
As you learned earlier, a guard statement always has to end with a control flow statement.
In Swift, there are four control flow statements:
- return
- continue
- break
- throw
In the previous examples, you have seen how to use continue and return to transfer the control out of the scope.
Now let’s take a look at how you can throw errors with the guard statement.
In Swift, you can make a function throw an error by:
- Specifying the type(s) of error you want to throw.
- Using the throws keyword in front of the function body.
- Using the throw statement to throw an error.
When a function throws an error, it also transfers the control out of the scope to not continue the execution of an invalid code. This is why you can combine throwing errors with the guard statement.
Let’s see an example of a function that throws two types of errors using the guard:
enum AgeRestriction: Error {
    case legalAgeRequired
    case tooOld
}

func validate(age: Int) throws {
    guard age >= 18 else {
        throw AgeRestriction.legalAgeRequired
    }

    guard age < 65 else {
        throw AgeRestriction.tooOld
    }

    //
    print("You are ready to play the game.")
}
Here we have two different guard statements.
- The first guard statement makes sure the age is more than 18. If it is not, it throws an error of type .legalAgeRequired.
- The second guard statement ensures the age is not more than 65. If the age is 65 or over, the .tooOld error is thrown.
If both of these guard statements are true, the function execution continues and the game starts. If either one of the guard statements is false, the control flow is transferred out of the function and the game does not start.
Guard Available Statements
Sometimes in Swift, there are features that are not available for older iOS versions.
This is important to take into account not to crash the app on older devices.
Luckily, there is an #available attribute. You can use it to make a specific piece of code run only if the device’s version number is high enough.
You can combine the #available call with a guard statement.
For example, let’s stop the execution of the device in question is less than iOS 13:
guard #available(iOS 13, *) else {
    throw CameraError.deviceNotSupported
}
Guard Enum Case
You can also use the guard statement to match with enumeration cases.
Given an enumeration object, you can use the guard to check if the given case matches with the desired one.
For example, let’s create an enumeration State that represents three possible states of an imaginary machine:
enum State {
    case up
    case crashed
    case error
}
Now, let’s write a function called perform() that runs only if the machine is up:
func perform(state: State) {
    guard case state = State.up else {
        print("The program is in an unexpected state. Unable to proceed.")
        return
    }
}

// Try to perform in the error state:
perform(state: State.error)
Output:
The program is in an unexpected state. Unable to proceed.
Guard vs If Statement
The main difference between guard and if statements in Swift are:
- The if statement is used to run code when a condition is met.
- The guard statement is used to run code when a condition is not met.
The main use case difference between the guard statement and a regular if statement is in the code readability. Sometimes using an if statement can make things a bit too complicated.
For example, if a condition needs to be met for the rest of the code to make sense, you can use a guard statement.
If you used an if statement instead, you would need to put the rest of the code inside an if statement. Do this multiple times and you end up with a nested pyramid of doom.
For instance, let’s check if three optional values are not nil using if-let statements:
var a: String? = "This "
var b: String? = "is "
var c: String? = "test "

func printOptionals() {
    if let a = a {
        if let b = b {
            if let c = c {
                print(a + b + c)
            }
        }
    }
}

printOptionals()
This piece of code looks terrible.
To fix this, let’s use the guard statement instead:
var a: String? = "This "
var b: String? = "is "
var c: String? = "test "

func printOptionals() {
    guard let a = a else { return }
    guard let b = b else { return }
    guard let c = c else { return }
    print(a + b + c)
}

printOptionals()
Although both pieces of code work the same way, the latter one is way more manageable. This is because it is one-dimensional and readable.
Tip of the day: Start with an if statement. When everything is working, refactor the code to use the guard where needed.
Benefits of the Guard Statement in Swift
Using the guard can help you make your code more readable and maintainable.
Here is a bunch of reasons why it sometimes makes sense to use the guard:
- The code intent becomes clear. You can tell the guard directly what you want instead of what you do not want.
- Trap invalid arguments passed into the function.
- Unwrap optionals with the guard and make the unwrapped values usable.
- Save lines of code.
Conclusion
Today you learned how to use the guard statement in Swift.
To recap, you can use the guard statement to run code if a condition does not hold.
guard condition else {
    // statements
    // return, break, continue, or throw
}
The guard statement is similar to an if statement.
The guard statement solves the code readability issues that are present in some particular situations. In other words, a piece of code could be written in a cleaner way with the help of the guard.
A common use case for the guard to unwrap optional values and to use those values right away.
guard let myName = name else {
    print("Name is not defined")
    return
}
The guard statement is used to transfer the control flow out of the current scope.
You need to use one of the four control flow statements (return, continue, break, throw) to do this.
For example, you can use the guard in a function to validate values before running code.
Thanks for reading!