
In Swift, you can implement custom types using structures. A structure acts as a factory for creating objects.
For example, let’s create a Fruit structure and some Fruit instances of it:
// A Fruit factory
struct Fruit {
    let name: String
    var color: String
}

// Creating Fruit objects
let banana = Fruit(name: "Banana", color: "Yellow")
let apple = Fruit(name: "Apple", color: "Red")
This is the quick answer for what is a structure in Swift. However, if you are unfamiliar with structures, there is so much more to understand. In this guide, you are going to learn everything you need to know about structures in Swift.
Structures in Swift
A structure is a blueprint for creating instances in Swift. You can create custom types with structures. A structure acts as factories for creating instances.
For example, a game app could have an Enemy structure for creating different kinds of enemy objects.
To implement a structure in Swift, use the struct keyword and the following syntax:
struct TypeName {
    // Structure implementation here
}
Where:
- The struct keyword lets Swift compiler know that the following type is going to be a structure.
- The TypeName is the name you give to the structure. Usually the name begins with capital letter.
- The actual implementation of the structure goes in-between the curly braces {}. A structure can contain variables, constants, and functions.
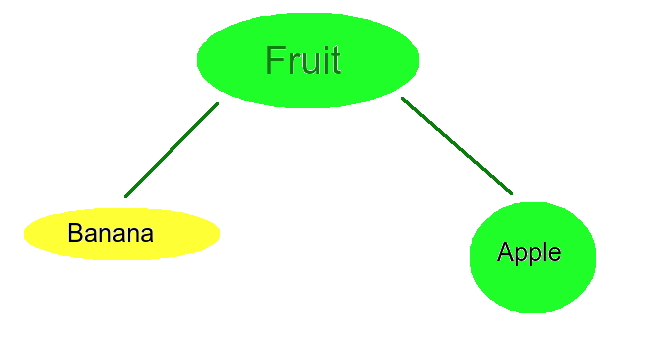
Here is an illustration of how a structure acts as a factory for creating objects (also called instances):

Structure Example
Let’s create a Fruit structure that describes a fruit characterized by a name and a color. The name and color are string properties that belong to the structure:
struct Fruit {
    let name: String
    var color: String
}
Now that the structure is in place, you can create Fruit instances for your program.
For example, let’s create a banana and an apple:
var banana = Fruit(name: "Banana", color: "Yellow")
var apple = Fruit(name: "Apple", color: "Red")
As you can see, it is pretty straightforward to create or initialize Fruit instances. All you need to do is give values for the properties defined in the structure. In this case, it is the name and the color strings.
Here is an illustration of the Fruit structure and its instances:
Accessing Structure Members
Now that you learned how to implement structures and create instances you may wonder what can you actually do with them.
A common thing to do with a struct instance is to access its properties.
In the case of the Fruit instances, you may want to read the color/name information. This happens via the dot syntax.
For example, let’s print the name and the color of a Fruit instance:
print("\(banana.color) \(banana.name)")
Output:
Yellow Banana
Similar to how you read the properties of an instance, you can modify their values. (This assumes that you are dealing with variables as you cannot modify constants).
For example, let’s change the color of the banana instance:
banana.color = "Brown"
Now you know how to use structures in Swift.
Next, let’s take a closer look at the initialization process within structures.
Struct Initialization Process
Whenever you create an instance of a structure, it has to be initialized. This means assigning the initial values to the members of the instance. Initialization can be thought of as preparing the instance for use.
In the previous chapter, you saw an example with a Fruit structure. When you create Fruit instances, Swift automatically initialized them for you. Behind the scenes, it assigned the name and color values to the instances themselves.
This automatic initialization process is called memberwise initialization. Let’s take a deeper look at how it works.
Memberwise Initializer
A memberwise initializer is the default initializer automatically implemented in every structure that does not have a custom initializer.
The memberwise initializer prepares the instance by assigning the given values to the instance members.
For example, given the Fruit structure you already saw:
struct Fruit {
    let name: String
    var color: String
}
You can create a Fruit instance by:
let banana = Fruit(name: "Banana", color: "Yellow")
Behind the scenes, this calls the memberwise initializer that assigns the specified name and color values to the instance itself.
But why is this important to understand?
You can override the memberwise initializer by implementing a custom init() method into the structure. This is a common thing to do when dealing with structures in Swift.
Let’s take a look at what that means.
The init() Method
The init() method is used to prepare an instance. Commonly you assign initial values to properties of the instance in the init() method.
If you have worked with classes in Swift, you know each class has to implement the init() method to work properly.
With structures, the init() method is not required due to the memberwise initializer. However, it is quite common you need to override the init() method. Thus it is important to understand how to do it.
Let’s continue with the Fruit structure you saw earlier. This time, let’s implement an init() method to it:
struct Fruit {
    let name: String
    var color: String

    init(name: String, color: String) {
        self.name = name
        self.color = color
    }
}
Let’s inspect the init() method:
- The init() method takes two arguments, the name and the color. These are the arguments you fill in when creating a Fruit instance.
- The self keyword refers to the instance itself. In this context, you can interpret self as “This very Fruit object”.
- In the init() method, you store the user-specified name and color to the object itself. This happens by
self.name = nameandself.color = color.
Now, whenever you create a Fruit instance, the init() method automatically runs behind the scenes and prepares the instance.
let apple = Fruit(name: "Apple", color: "Red")
Now it is possible to access the properties of the Fruit instance as you would expect:
print("This is a \(apple.color) \(apple.name)")
Output:
This is a Red Apple
Initialization Rules
You can run any valid Swift code in the init() method. The only thing you need to be careful about is to specify values for each property in the structure before returning from the initializer.
For example, let’s accidentally forget to assign a value to the color property in the initializer:
struct Fruit {
    let name: String
    var color: String

    init(name: String, color: String) {
        self.name = name
    }
}
This results in the following error:

This error prevents you from running the code without specifying both the name and the color properties in the initializer.
So make sure to initialize all the properties in the initializer!
However, there is one exception: optionals.
An optional is a type that represents something having a value or being nil.
If a structure has an optional property, it is fine to leave it unspecified in the initializer.
For instance, let’s modify the Fruit structure such that the color property is an optional string. Now it is fine to leave it unset in the init() method:
struct Fruit {
    let name: String
    var color: String?

    init(name: String) {
        self.name = name
    }
}
Other than these previously described limitations, you can do any kind of processing in the initializer.
For example, let’s capitalize the name and color of the Fruit upon creation. To do this, call the .uppercased() method of a string before assigning the values to the instance:
struct Fruit {
    let name: String
    var color: String

    init(name: String, color: String) {
        self.name = name.uppercased()
        self.color = color.uppercased()
    }
}
Now the init() method converts the name and the color to the upper case when you create Fruit instances.
let banana = Fruit(name: "banana", color: "yellow")
print(banana.name, banana.color)
Output:
BANANA YELLOW
Now you should have a pretty solid understanding of the initialization process of a structure.
Next, let’s take a look at how you can implement multiple init() methods for your convenience.
Additional Initializers
In Swift, you can specify multiple init() methods into a structure. This can sometimes be convenient when you want to have syntactically different ways to initialize instances.
Just remember that an additional initializer also follows the rules of the initialization process. This means you need to assign values to all properties of the structure.
Commonly, an additional initializer does some work before calling the original initializer method to actually set up the instance.
Let’s see an example.
In the previous chapters, you worked with the Fruit structure with a single initializer.
struct Fruit {
    let name: String
    var color: String

    init(name: String, color: String) {
        self.name = name
        self.color = color
    }
}
As you already know, you can create Fruit instances with the following syntax:
Fruit(name: "banana", color: "yellow")
However, say you want to create Fruit objects by pulling the name and the color info from a string like this: “Banana,Yellow”.
To do this, extract the information from the string before initializing the Fruit instance:
let info = "Banana,Yellow"

// Extract name and color from the 'info' string
let parts = info.components(separatedBy: ",")
let name = parts[0]
let color = parts[1]

// Initialize the Fruit
let banana = Fruit(name: name, color: color)
print(banana.name, banana.color)
Output:
Banana Yellow
However, this is impractical as you always have to repeat the same actions before creating a Fruit instance.
To overcome this, let’s create another init() method that parses the name and color from a string before initializiation:
struct Fruit {
    let name: String
    var color: String

    init(name: String, color: String) {
        self.name = name
        self.color = color
    }

    init(info: String) {
        // Extract the name and color from 'info'
        let parts = info.components(separatedBy: ",")
        let name = parts[0]
        let color = parts[1]
        // Create the instance by calling the original init() method
        self.init(name: name, color: color)
    }
}
Now you can create Fruit instances in the two desired ways:
let banana = Fruit(info: "Banana,Yellow")
let apple = Fruit(name: "Apple", color: "Red")

print(banana.name, banana.color)
print(apple.name, apple.color)
Output:
Banana Yellow
Apple Red
Now you have a good understanding of the initialization process of a structure.
So far the structures in the examples have consisted of variables or constants. However, you can also add functions to a structure.
Functions in Structures
In Swift, you can add functions to structures. You can then call these functions on the instances of the structure to perform actions.
Creating a function into a structure works the same way as implementing any other function in Swift. The only difference is you commonly use the self keyword to access the properties of the instance.
For example, let’s create a Fruit structure with an info() method that prints useful information about the Fruit instance:
struct Fruit {
    let name: String
    var color: String

    func info() {
        print("Hi, I am a \(self.color) \(self.name)")
    }
}
In the info() function, the function can access the color and name properties of the object via the self keyword.
Now you can create Fruit instances and call the help() function for them using the dot syntax.
For instance:
let banana = Fruit(name: "Banana", color: "Yellow")
banana.info()
Output:
Hi, I am a Yellow Banana
Now you understand the basics of structures in Swift.
To recap,
- You can create structures to represent custom types in your project.
- A structure can have properties and methods that can be called on the instances later on.
- A structure has to be initialized using the init() method or by using the default memberwise initializer.
Next, let’s inspect some intermediate properties of structures in Swift.
Struct Inheritance
If you have worked with classes in Swift, you know what is inheritance.
If you don’t, inheritance means subclassing. For example, an Employee class could inherit properties from the Person class because each Employee is also a Person.
However, structures do not allow inheritance!
If you need to allow inheritance, you need to use a class instead of a structure.
Struct Extensions
An extension, as the name suggests, offers a way to extend a type in Swift.
To create an extension, use the following syntax:
extension TypeName {
    // Implement the extended behavior here
}
Where:
- extension is a keyword that tells the Swift compiler to extend the functionality of an existing type.
- TypeName is the name of the existing type.
In Swift, you can extend the functionality of a structure.
For example, let’s write a Fruit structure and extend it with an info() method:
struct Fruit {
    let name: String
    var color: String
}

extension Fruit {
    func info() {
        print("Hi, I am a \(self.color) \(self.name)")
    }
}
Now you can create Fruit instances and call the extended info() method on them:
let banana = Fruit(name: "Banana", color: "Yellow")
banana.info()
Output:
Hi, I am a Yellow Banana
Hashable Structures
A structure instance can be added to a collection, such as an array.
For instance, let’s add three Fruit instances to an array:
struct Fruit {
    let name: String
    var color: String
}

// Fruit instances
let banana = Fruit(name: "Banana", color: "Yellow")
let apple = Fruit(name: "Apple", color: "Red")
let clementine = Fruit(name: "Clementine", color: "Orange")

// Fruit array
let fruits = [apple, banana, clementine]
Also, you can freely add structure instances to a dictionary as values:
struct Fruit {
    let name: String
    var color: String
}

let banana = Fruit(name: "Banana", color: "Yellow")
let apple = Fruit(name: "Apple", color: "Red")
let clementine = Fruit(name: "Clementine", color: "Orange")

let data = ["Alice": apple, "Bob": banana, "Charlie": clementine]
However, if you want to add a structure instance as a key into a dictionary, you need to make the structure hashable. To do this, make the structure conform to the Hashable protocol using a colon after the structure name.
For instance:
struct Fruit: Hashable {
    let name: String
    var color: String
}

// Fruit instances
let banana = Fruit(name: "Banana", color: "Yellow")
let apple = Fruit(name: "Apple", color: "Red")
let clementine = Fruit(name: "Clementine", color: "Orange")

let data = [apple: "Alice", banana: "Banana", clementine: "Clementine"]
In short, hashability is a requirement because each key in a dictionary must be efficient to look up. The same applies to sets in Swift. To add a structure instance to a set, it needs to conform to Hashable.
To learn more about hashing and the Hashable protocol, check this article.
Structs vs Classes in Swift
The key difference between a structure and a class in Swift is that a structure is a value type and a class is a reference type.
Most of the time you should prefer structs over classes. A good rule of thumb is to use a class when you need a feature not supported by a structure.
Here is a table of differences between structs and classes in Swift:
| Feature | Struct | Class |
|---|---|---|
| Inheritance | ✗ | ✓ |
| Deinitialization | ✗ | ✓ |
| Reference type | ✘ | ✓ |
| Value type | ✓ | ✘ |
Let’s pay closer attention to reference types and value types.
Structs Are Value Types
In Swift, structures are value types.
A value type is an object that is copied on an assignment.
For example, given the Fruit structure:
struct Fruit {
    let name: String
    var color: String
}
Let’s make an experiment. Let’s create two Fruit instances such that the first one is assigned to the second one:
var fruit1 = Fruit(name: "Banana", color: "Yellow")
var fruit2 = fruit1
Now, let’s change the first Fruit instance:
fruit1.color = "Brown"
Then, let’s print the colors of the Fruit instances:
print(fruit1.color)
print(fruit2.color)
Output:
Brown
Yellow
As you can see, the colors are different. The important thing to realize is that changing the color of fruit1 does not affect fruit2. This proves that fruit1 and fruit2 are independent instances even though we created fruit2 by assigning fruit1 to it.
Here is an illustration of the situation:

This is what it means to be a value type.
But why is this worth mentioning? One could argue the result of the above experiment is obvious. However, as it turns out, a class behaves entirely differently in Swift.
Let’s make a quick comparison between a class and a structure in Swift.
Classes Are Reference Types
In the previous chapter, you learned that a structure is a value type in Swift.
But this is not the case for classes in Swift. A class is a reference type in Swift.
This means that a class instance is not copied on an assignment. Instead, it starts referencing the same object.
To demonstrate this, let’s repeat the experiment from the previous chapter. This time, however, the Fruit is a class.
For example, given the Fruit class:
class Fruit {
    let name: String
    var color: String

    init(name: String, color: String) {
        self.name = name
        self.color = color
    }
}
Let’s create two Fruit instances such that the first one is assigned to the second one:
var fruit1 = Fruit(name: "Banana", color: "Yellow")
var fruit2 = fruit1
Now, let’s change the color of the first Fruit:
fruit1.color = "Brown"
Then, let’s print the colors of the Fruit instances:
print(fruit1.color)
print(fruit2.color)
Output:
Brown
Yellow
As you can see, the colors are the same. Changing the color of fruit1 changed the color of fruit2 too. This proves that fruit1 and fruit2 reference the same object.
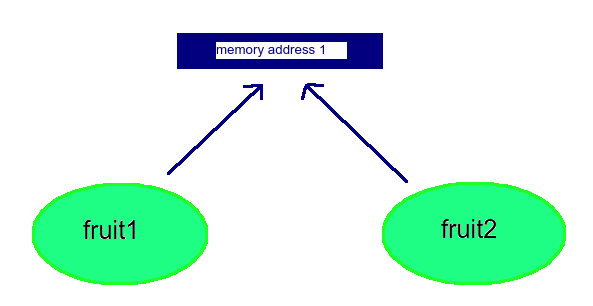
This is what it means to be a reference type.
Now you know what is the difference between structures and classes.
Finally, let’s take a look at some common built-in structures in Swift.
Popular Built-In Structs in Swift
In Swift, all the basic types are structures. Even if you heard about structures for the first time today, you have probably been using them extensively already.
The following basic data types are implemented as structures behind the scenes:
As you learned, structs are value types. This means all the basic Swift types are value types. In other words, you can copy them on assignments.
Conclusion
Today you learned what are structures in Swift.
To recap, a structure allows you to create custom types in your project. You can use a custom type to create instances in your project.
For example, a game app could have an Enemy structure that allows the creation of enemy instances in the game.
Each structure instance has to be initialized. This happens either via the memberwise initializer automatically or by specifying the init() method.
A structure can have properties and methods that can be called on the instances.
The key difference between a struct and a class is:
- A structure is a value type.
- A class is a reference type.
Most of the time, you should use structs over classes in Swift.