To create an iOS app, you need to install an app called Xcode on your Mac.
Xcode is a code editor where you write your iOS programs and run them.
In this chapter, you are going to learn how to install Xcode, create a program file, and run the program.
Because this is a beginner-level Swift programming course, we are not going to build an actual app yet. Instead, we are solely focusing on coding, which is what you should do if you have never coded before.
Thus you can also complete this course using a free online code editor. However, you should only do this if you do not have an access to a Mac or Xcode.
Install Xcode: Step-by-Step
The best way to develop iOS apps is by using a Mac and installing software called Xcode to it.
To Install Xcode:
- Open up the App Store on your mac
- Search for “Xcode“.
- Install the Xcode Developer Tools on your machine.
The installation can take a long time.
If you do not want to wait for the installation before starting the course, feel free to open up a free online code editor for Swift and jump into the 1st chapter.
Creating the First Swift Code File
After the Xcode installation has been completed, you can open up the app.
A welcome window like this pops up.

To write Swift program code, you need to have a file where you can write the code. More importantly, you need to be able to run the code to see the results.
This is where you can use an Xcode Playground file.
A playground is not the same as an iOS app. Instead, it is a special file that can be used run example programs when learning/testing Swift.
In this course, you should only work with Playground files to learn Swift programming.
Only after you have learned the basics of Swift are you going to create an actual iOS app.
Anyway, let’s create a new Playground.
To do this, navigate to the top left corner and select File > New > Playground.
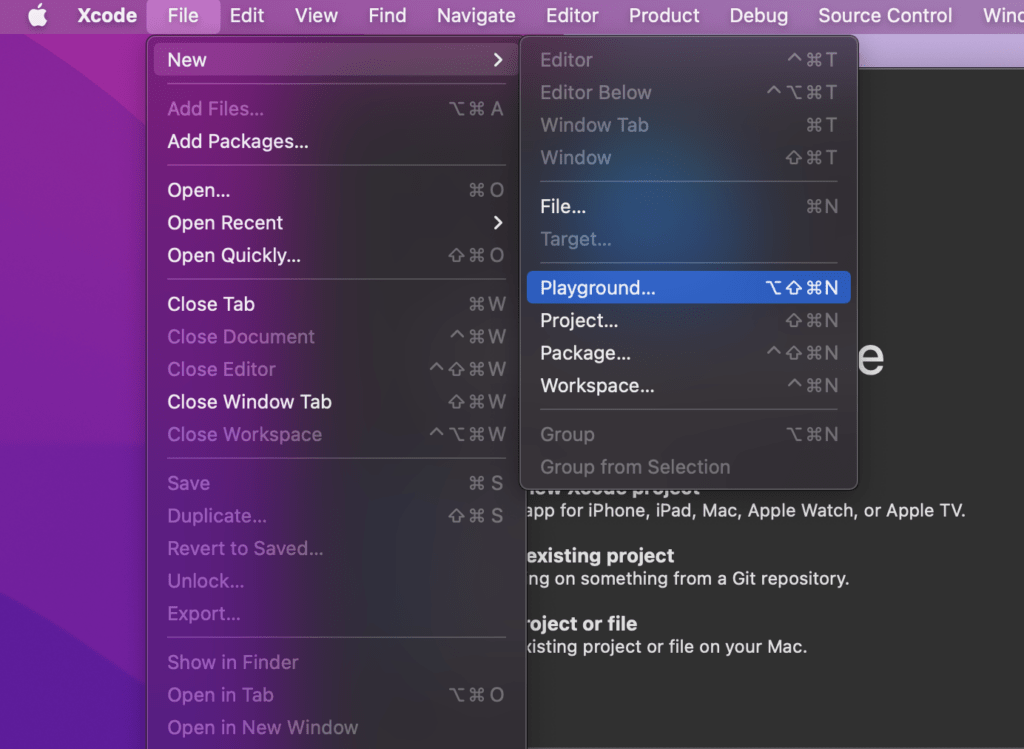
Then choose a Blank file and give it some name, such as Example.
After a second, a view like this appears.

This is the Xcode Playground file.
In this type of file, you are going to write all the code you see throughout this course.
Inspecting the Code File
Let’s inspect the most important parts of the file:
- Code Editor. This is where your code lives. As you can see, there is already some placeholder code.
- Line number & Run Button. This area shows the line numbers. Also, if you hover over this area, you are going to see a blue play button appear. If you click this button, it is going to run the highlighted code lines.
- Status Bar. This shows the current status of the playground. If it says “Ready”, Xcode is ready to run your code.
- Run the Playground. This button lets you run all the code inside the playground.
- Console. This area shows you the result of running the code in the Code Editor.
This is all the info you need to know about a playground.
Before we start the actual course, let’s make sure everything works as expected by running a simple program.
Running the First Program
Now activate the code editor and type some simple math expressions to the playground, such as 1+1 or 2+2.
This is valid Swift that the Playground should be able to run.
Click the blue play button on the line number column or click the play button on the bottom left of the editor to run the code.
Then take a look at the console on the right-hand side. You should see the results of your basic calculations appear there.

Awesome!
Now you are ready to start the course.
Tip: Create a new playground for each chapter!
Next chapter: Variables and Constants
Conclusion
In this chapter, you learned how to install Xcode and start a new code project called Playground.
To recap, a Playground file is a code file you can open with Xcode.
This is a program file where you can write code. More importantly, you can run the code in the file and see the results.
You are going to use Playground files throughout this guide.
As a matter of fact, you should write every single piece of code in this course into a Playground file.
If you do not have a Mac or cannot access Xcode, you can also run Swift in an online compiler like this one.
Next chapter: Variables and Constants