In Python, you can inspect any object with the built-in help() function.
For example:
from math import sqrt

help(sqrt)
Output:
Help on built-in function sqrt in module math:

sqrt(...)
    sqrt(x)

    Return the square root of x.
(END)
If this is not enough, there are other functions you can call on an object to get more specific info about the object:
- type(obj). Returns the name of the class that implements the object.
- dir(obj). Returns all methods and variables of the object.
- id(obj). Returns the unique identified of the object (memory address).
- hasattr(obj, name). Chcks if an attribute belongs to an object.
- getattr(obj, name, default). Gets an attribute that may belong to an object.
- callable(obj). Checks if an object is callable, that is, it can be called.
In this guide, we take a closer look at each of these built-in functions to make exploring Python objects as easy as possible.
Before We Start
Before we start using the functions above, we need an object that we can inspect. This object could be literally any object in Python.
To keep it simple, you are going to use a simple example class and its object throughout this tutorial.
Here is the class:
class Weight:
    """
    A Weight class that describes weights as kilos.
    """
    def __init__(self, kilos):
        """
        Assign the amount of kilos to the Weight object
        """
        self.kilos = kilos

    def topounds(self):
        """
        Convert the kilos to pounds.
        1 kilo = 2.2048 pounds
        """
        return self.kilos * 2.2048
Throughout this guide, you will be working with this class or objects created from it.
help()
The built-in help() function displays helpful information about the object passed as an argument.
You can call help() on modules, functions, classes, variables, and so on.
Take a look at the implementation of the Weight class in the previous chapter. You see triple quotation mark comments all over the class. In reality, these are not comments. Instead, they are called docstrings.
A docstring is a piece of documentation that gets picked up by the help() function. The help() function displays this docstring in the console to help the developer quickly see what the object is all about. By the way, to describe an object with a docstring, you need to specify it at the first line after the definition.
For example, let’s call help() on the topounds() method of the Weight class:
help(Weight.topounds)
Output:
Help on function topounds in module __main__:

topounds(self)
    Convert the kilos to pounds.
    1 kilo = 2.2048 pounds
This displays the docstring you specified at the beginning of the topounds() method definition.
Now that you understand what the help() function does, let’s call it on the whole Weight class:
help(Weight)
Output:
Help on class Weight in module __main__:

class Weight(builtins.object)
 |  Weight(kilos)
 |
 |  A Weight class that describes weights as kilos.
 |
 |  Methods defined here:
 |
 |  __init__(self, kilos)
 |      Assign the amount of kilos to the Weight object
 |
 |  topounds(self)
 |      Convert the kilos to pounds.
 |      1 kilo = 2.2048 pounds
 |
 |  ----------------------------------------------------------------------
 |  Data descriptors defined here:
 |
 |  __dict__
 |      dictionary for instance variables (if defined)
 |
 |  __weakref__
--More--
Here you can see everything related to the class. First, you see the docstrings you wrote into the class. Then you see a bunch of automatically generated documentation related to the class properties.
Anyway, now you should have a pretty good understanding of how the help() function works in Python. Remember, you can call this function on any Python object for quick reference.
For example, you could call it directly on a Weight object instead of the Weight class.
w1 = Weight(100)
help(w1)
This results in the same output as help(Weight).
type()
In Python, you can get type information about an object with the built-in type() function.
By type information I mean information about the class that implements the object.
Let’s use the example Weight class defined earlier to demonstrate how the type() function works:
w1 = Weight(100)
print(type(w1))
Output:
<class '__main__.Weight'>
This tells you the object w1 is of type Weight.
Now, you can use the type() function to check the type of anything.
For example, let’s check the type of a string:
word = "Test"
print(type(word))
Output:
<class 'str'>
This tells you that the word is of type str, which indeed is the built-in type that represents Python strings.
Sometimes you see type() called with three arguments. This has nothing to do with the type() function. Instead, it is the type class used in metaprogramming. If you are interested, check this article.
dir()
To list all the attributes of an object, use the built-in dir() function.
It returns a long list of attribute names, that is, method and variable names of the object.
For example, let’s create a Weight object and list its attributes:
w1 = Weight(100)
print(dir(w1))
Output:
['__class__', '__delattr__', '__dict__', '__dir__', '__doc__', '__eq__', '__format__', '__ge__', '__getattribute__', '__gt__', '__hash__', '__init__', '__init_subclass__', '__le__', '__lt__', '__module__', '__ne__', '__new__', '__reduce__', '__reduce_ex__', '__repr__', '__setattr__', '__sizeof__', '__str__', '__subclasshook__', '__weakref__', 'kilos', 'topounds']
There is a bunch of automatically generated attributes in any Python class. Those are listed first when calling the dir() function.
But take a look at the end of the list. There you can see attributes ‘kilos’ and ‘topounds’ that we implemented in the class. Also, you can find the ‘__init__’ mentioned in the middle of the list too.
Once again, you can call the dir() function on any Python object.
For example, let’s import the math module, and list all the methods it has:
import math
print(dir(math))
Output:
['__doc__', '__loader__', '__name__', '__package__', '__spec__', 'acos', 'acosh', 'asin', 'asinh', 'atan', 'atan2', 'atanh', 'ceil', 'comb', 'copysign', 'cos', 'cosh', 'degrees', 'dist', 'e', 'erf', 'erfc', 'exp', 'expm1', 'fabs', 'factorial', 'floor', 'fmod', 'frexp', 'fsum', 'gamma', 'gcd', 'hypot', 'inf', 'isclose', 'isfinite', 'isinf', 'isnan', 'isqrt', 'ldexp', 'lgamma', 'log', 'log10', 'log1p', 'log2', 'modf', 'nan', 'perm', 'pi', 'pow', 'prod', 'radians', 'remainder', 'sin', 'sinh', 'sqrt', 'tan', 'tanh', 'tau', 'trunc']
If you take a look at the names without __, you see some familiar variable/method names there. These are all the variables and methods that belong to the math module.
id()
In Python, each object has an identity. The identity is an integer value that is constant throughout the lifetime of the object.
To access ID any Python object, you can call the built-in id() function on it.
For instance, let’s create a Weight object and check its identity:
w1 = Weight(100)
print(id(w1))
Output:
140701211565024
This operation can be useful to check if two objects are the same. If the identity of two objects matches, it means they both refer to the same object in memory, each with a different alias.
For example, let’s create two Weight objects w1 and w2 such that w2 is set equal to w1:
w1 = Weight(100)
w2 = w1
What happens behind the scenes is that both w1 and w2 point to the same Weight(100) object in memory.
Here is an illustration:
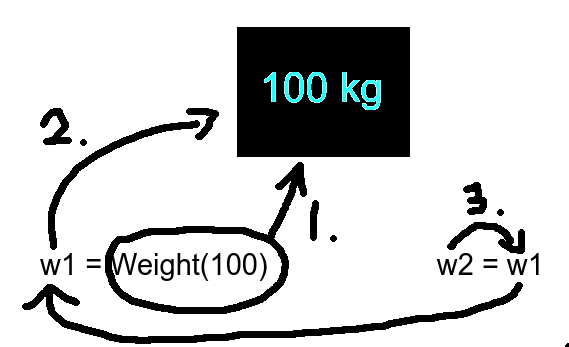
In other words, both w1 and w2 should now have the same ID as they point to the same object in memory.
Let’s check if this is the case:
print(id(w1))
print(id(w2))
Output:
140249810303968
140249810303968
The IDs match, so the objects w1 and w2 are the same objects.
As with the previous functions, you can also call id() on any Python object to check its identity.
hasattr()
The hasattr() method can be used to check if an object has a specific attribute.
The syntax is as follows:
hasattr(obj, name)
Where:
- obj is the object under inspection.
- name is the name (as a string) of the possible attribute.
This function returns True if the attribute exists and False if not.
For instance, let’s check if the class Weight you implemented earlier has an attribute called topounds:
print(hasattr(Weight, "topounds"))
Output:
True
You can call this function on any Python object to see if there is an attribute with a specific name.
For example, let’s check if the math module has a pi attribute:
import math

print(hasattr(math, "pi"))
Output:
True
getattr()
To get the value of an attribute from an object, you can use getattr() function.
The syntax is:
getattr(obj, name, default)
Where:
- obj is the object under inspection.
- name is the possible attribute name as a string.
- default is an optional default value for name if it does not exist.
When the attribute exists, calling getattr(obj, name) is the same as calling obj.name.
The usefulness of this function becomes clear when you call it with three arguments. If obj does not have the name attribute, the default is returned. But if you called obj.name instead, and the name did not exist, an error would be thrown.
For example, let’s access the kilograms property of a Weight object:
w1 = Weight(100)

print(w1.kilograms)
Output:
AttributeError: 'Weight' object has no attribute 'kilograms'
Error! There is no such attribute, so the code crashes.
Now, let’s use getattr() instead:
w1 = Weight(100)

print(getattr(w1, "kilograms", "Not specified"))
Output:
Not specified
Here you can see that the default value is returned instead of crashing the code.
However, using getattr() is not that common. It can be tricky to see how it can benefit you.
Let’s see an example.
Suppose you have a class that implements greetings in multiple languages as methods that return the greetings as strings:
class Greeting:
    def french():
        print("Bonjour")

    def english():
        print("Hello")

    def german():
        print("Hallo")

    def finnish():
        print("Moi")

    def default():
        print("Undefined language")
Then let’s say you need to implement a function outside the class that calls a greeting based on user input:
def greet(language):
    if language == "french":
        Greeting.french()
    elif language == "english":
        Greeting.english()
    elif language == "german":
        Greeting.german()
    elif language == "finnish":
        Greeting.finnish()
    else:
        Greeting.default()
But the problem is there is quite a lot of repetition here.
This is where getattr() stands out. It lets you call the Greeting methods using strings. This way you can completely forget about the lengthy if-else statements.
This is how the greet() function looks like when implemented with getattr():
def greet(language):
    greeting = getattr(Greeting, language, Greeting.default)
    greeting()
The function checks if the Greeting class has an attribute, that is, a method for the language user-specified. If it has, it runs that greeting function. If it doesn’t, it executes the default() function.
Now you can call the greet() function with multiple inputs:
greet("french")
greet("english")
greet("german")
greet("finnish")
greet("spanish")
Output:
Bonjour
Hello
Hallo
Moi
Undefined language
Here is the full code for your convenience:
# Greetings in different languages
class Greeting:
    def french():
        print("Bonjour")

    def english():
        print("Hello")

    def german():
        print("Hallo")

    def finnish():
        print("Moi")

    def default():
        print("Undefined language")

# Choose a function to call based on the input language
def greet(language):
    greeting = getattr(Greeting, language, Greeting.default)
    greeting()

# Example calls
greet("french")
greet("english")
greet("german")
greet("finnish")
greet("spanish")
Output:
Bonjour
Hello
Hallo
Moi
Undefined language
So the main idea behind the getattr() function is to be able to reduce repetition and call attributes using strings. This can be useful in metaprogramming for example.
callable()
Sometimes you may be interested to know in advance if an object is callable.
In layman’s terms, this means checking if you can put parenthesis (and arguments) after the object to run some code.
To check if an object is callable, call the built-in callable() function on it. This function returns True if the object is callable and False if not.
For example, let’s check if the attributes kilos and topounds are callable in the Weight class you implemented earlier.
w1 = Weight(100)

print(callable(w1.kilos))
print(callable(w1.topounds))
Output:
False
True
As you can see:
- The kilos attribute is not callable. This means you cannot do w1.kilos(). Instead, it is a variable that is accessible by w1.kilos.
- The topounds method is callable. This is because you can execute a piece of code by calling w1.topounds().
Conclusion
Today you learned how to inspect a Python object.
To recap, there are multiple functions you can use to inspect Python objects:
- help() to show the documentation of an object.
- type() to show the base class of the object.
- dir() to show a list of attributes of the object.
- id() to check the identifier of the object.
- hasattr() to check if an attribute exists in the object.
- getattr() to get an attribute that may exist in an object.
- callable() to check if you can call an object.
Out of these seven options, you will probably use help(), type(), and dir() the most.
Thanks for reading.
Happy coding!