Are you looking to create the next best-seller app? Or are you curious about how to create a successful mobile app?
This is a step-by-step guide on how to create an app. After reading this guide, you know what it takes to create an app from an idea to getting your first customers.
You are not going to write code in this guide. Instead, you will learn the overall process of creating a successful mobile app.
If you are looking for iOS app coding courses, feel free to read Best iOS App Development Courses
Also, keep in mind there are lots of steps to take. If you are working alone, you are responsible for completing each step by yourself. If you have a team, you can share the tasks based on the team members’ expertise.
Here is an overview of the steps to take to build a mobile app:
- Start with the problem
- Do competitive market research
- Choose the features
- Build the design mockups
- Implement the design
- Create an effective marketing plan
- Build the app
- Publish the app
- Market the app through the roofs
- Iterate the app with user feedback
At the end of the guide, you will also find answers to common questions, such as do you need to be a programmer to create apps.
Before jumping into the steps, here is a quick look at the expectations vs reality of mobile app development.
Mobile App Development: Expectations vs Reality

Building a successful mobile app is not about writing code. It’s all about solving a customer problem in a form of an app. It’s business like any other. There is a huge competition, and to succeed, you must fail many times and work super hard.
Expectations
Many people think app development means:
- Coming up with a cool and unique idea.
- Writing code for a while.
- Publishing the ready app.
- Never touching the app ever again.
But in reality, it’s none of the above. The above describes the process of creating mobile apps for fun or as a hobby. To build a successful app, the process is completely different.
Reality
Creating a successful app involves a rigorous feedback loop for implementing features to solve users’ problems. It’s an ongoing process that is going to take years.
First of all, you shouldn’t really “come up with” app ideas. Instead, you should have a problem you face all day that you want to fix. Furthermore, you need to verify that an app is a viable solution to the problem.
After finding a problem to solve with a mobile app, you need to see whom you are competing against.
If it still seems like a great idea to build an app, start planning the minimal feature set that solves the problem.
Then build design mockups for the app and implement the actual design.
Before choosing how to build the actual app, you need to come up with an effective marketing plan.
Finally, it’s time to decide how to build the app. You can use freelancers, hire someone, or use no-code or low-code solutions. In case none of these is possible, you have to code the app yourself.
When the MVP version of your app is ready, it’s time to go live and execute the marketing plan.
When the first users pour in, the endless feedback loop begins. Your users tell you what they don’t like about the app. Then you choose which features to implement to the app to better help users solve their problems.
This is a quick overlook at the entire app creation process.
If you are not looking to create a full-scale app business, some of the steps in this guide will be unnecessary. Or if you are practicing coding and looking to create apps as a hobby, you will find most of the information useless. But if you are looking to make money from creating apps, you have to do it the hard way!
Next up, we are going to take a deeper look at the app creation business.
Step 1. Start with the Problem to Solve
Like any successful business, your app needs to solve a problem. If your app does not solve a problem, you are not going to build a successful business.
First, inventing something new is not necessary. As a matter of fact, it’s really difficult to come up with something 100% original. So never say “This would be a good idea but it’s already done”. Of course, you need common sense on whom you want to compete against. But never scrap an idea because it’s not original!
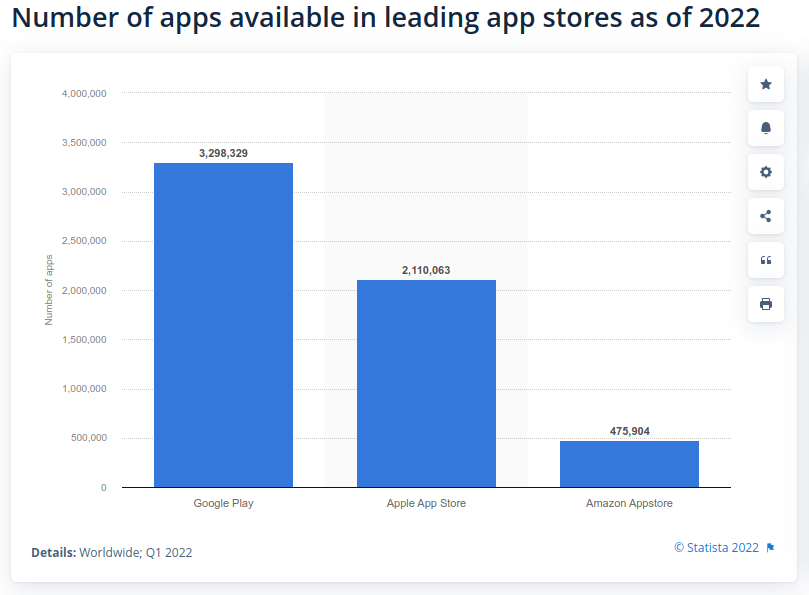
Speaking of competition, Google Play, Apple App Store, and Amazon Appstore have almost 6M apps combined.
In the app business, it’s not about the uniqueness of the idea. It’s about who does it best. Also, by combining existing ideas, you can come up with something no one has done before.
Think about an app you use every day. By taking a closer look, you’ll find it’s a combination of elements from existing apps or ideas.
For example, think about Whatsapp. It combines:
- Sending messages
- Making phone calls
- Making video calls
- Sending messages to groups of people
This all-in-one solution for messaging is a combination of existing ideas. Before WhatsApp, you needed to use separate applications for each task:
- Sending messages was possible by using the built-in messaging app.
- Phone calls took place by using the native calling features of a phone.
- Video calls used to be possible by using a desktop device with software like Skype.
- Group messaging was possible via emails or apps like Skype or Messenger.
These days, all of these can be found in one free application, like WhatsApp.
The key takeaway of this is to keep juggling with existing ideas. Don’t be afraid not to be innovative.
Here are some tips for coming up with a perfect app idea.
Tip 1. Solve Your Own Problem
Love the problem, not the solution.
Create an app that solves one of your everyday problems. The app must be something you will use every day.
This is the best approach to starting any business. It’s not even recommended to start a business that doesn’t solve your own problem.
If you are facing a problem, chances are other people are facing it too. If you think that problem can be solved with a mobile app, then it probably is a great time to build one.
The best part of solving your own problem is you have:
- Domain knowledge about the problem
- Willingness to solve the problem
- A real problem worth solving
If there’s no problem, there is no solution. If you know nothing about the problem, there is no way for you to truly solve it.
Jot down your everyday problems. These could be work-related, hobby-related, or anything truly meaningful to you. Once again, don’t worry if someone has already done it. If there is a way for you to do it better, you are going to do well.
Of course, you need to use common sense when juggling with existing ideas. If you want to build a dating app, fitness app, or social media platform, you are going to face an unbelievably difficult competition.
For example, to build a successful dating app, you need to beat big companies with dozens of employees. This is something cannot do, at least all by yourself.
Tip 2. Combine Existing Ideas
As discussed earlier, a common way to come up with an app idea is by combining existing ideas.
You can come up with an app idea by:
- Implementing an existing idea with a slight twist on it.
- Taking the best features of your favorite apps and combine them.
- Doing something better than anyone else has done.
Think about dating apps. It seems as if there’s always a new dating app that revolutionizes the dating game. In reality, all those apps work the same way.
Tip 3. Solve a Problem in an Existing App
Solve a problem in an existing app.
Think about the apps you’ve used in the past. Was there a feature that was missing?
If there was, chances are others found it too. You can even read the reviews of an app to see if the users are complaining about the missing feature. If the author of the app hasn’t bothered fixing the issues, this is your chance! You can create your own app that patches the missing key feature.
This technique falls into the category of solving a meaningful problem in the previous technique. This is another way to look at it.
At this point, you have a solid ground to start building ideas.
When you have a prominent idea, it’s time to make some market research to avoid building something useless. The next section teaches you how to conduct effective market research for validating your app idea.
Step 2. Do Competitive Market Research

Once you have an app idea, you need to validate it by conducting comprehensive market research.
During this phase, you will figure out to which extent your app idea is implemented by others. Also, you will learn the level of competition. All in all, marketing research helps you validate the idea.
As I mentioned earlier, you shouldn’t be bothered by the fact that your idea is not new. As a matter of fact, it’s good there are apps based on your idea. This shows your idea is actually working.
Instead, I’d be worried if there are no other competing apps. If there’s no competition, chances are someone already did it and failed. For no-competition ideas, the demand is usually low. Furthermore, the problem you solve commonly turns out to be non-existent.
The goal of the market research phase is to tell how well other apps are solving your idea.
- Perhaps none of the existing apps truly solve the problem.
- It could also be the author stopped updating the app.
- Or maybe there was no real demand for the solution.
Before heading over to the App Store, use Google to find out solutions to your problems.
Even though you think an app best solves the problem, there might be a better solution. For example, it could be a web app, physical product, or something else.
This works the other way around too. If there are great solutions in other formats, but there is no mobile app, it could be your chance!
If you are sure your problem needs an app to be solved, the next step is to go to the app marketplaces. Go through the ratings and reviews of apps that compete with yours. Pay close attention to the following characteristics:
- The name of the app
- The features of the app
- Pricing models
- Free
- Subscription-based
- One-time payment
- Ads
- In-app purchases
- The app publisher
- Last updated
- Reviews and ratings
- Number of downloads
Keep track of your findings. Use Excel or at least some spreadsheet to collect the information. The findings give you a direction to go with your app. You get great feature ideas, pricing models, and other useful information about the space around your idea. You can then use these findings to develop your app.
Let’s have a closer look at the app characteristics to look for.
1. Analyze the App Names
Pay attention to the characteristics of the names used in your competing apps.
- Is there a specific keyword in the name?
- Is the idea identifiable from the app name?
- Is the name short?
- Is the name long?
This, later on, helps you come up with the name for your app. If there is a pattern all successful apps use, you should do it too.
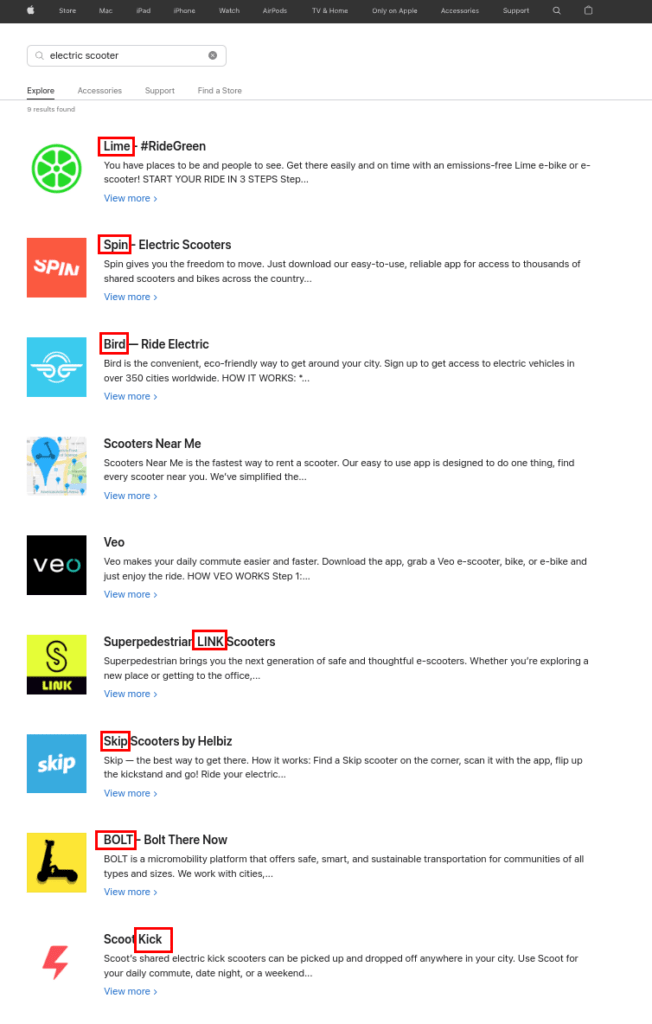
My favorite example is the electric scooter brands. Take a look at the names of the brands:
- Dott
- Bolt
- Wind
- Bird
- Tier
- Lime
- Zeus
- Zipp
- Pony
- Reby
All these names are abstract words with four letters in the name. So clearly it makes sense to pick a non-associative short name for an e-scooter business.
If you built your own e-scooter business, choosing a similar name would be advisable. This is simply because others found success in doing that.
2. Pay Attention to the Key Features
Take a look at the features of your competitor’s apps. Write them down and pay close attention to:
- What are the main features that all your competitors have?
- What unique features do the apps have?
- Are there any missing features in the existing apps?
This will help you get an overview of the typical app solving your problem.
Later on, you will also read reviews of the apps. Then you can pay attention to what the reviewers think about these features.
3. Examine the Pricing Models

How do your competitors make money?
This is an important question. You don’t want to build an app that doesn’t make money.
There are many ways apps can make money. The most common ones are (in no order):
- Ads
- In-app purchases
- Subscriptions
- One-time payment to install
- Collect and sell user data
- Affiliate marketing
By analyzing competitors’ monetization strategies, you gain valuable information about the money-making aspect of your app.
If all the apps are free of charge and ad-free, it might mean trouble.
On the other hand, if the apps are too pricey or littered with ads it can give you a chance to shine. If this is the case, consider building an ads-free app or a more affordable solution.
By comparing the pricing models of the apps, you also get an idea of what’s working and what’s not. If your competitors’ apps are free to download, yours should probably be as well. If your competitors fail in selling in-app products, your app might have similar struggles.
4. Who Is the Publisher?
Who is the publisher of the app or apps you are competing against?
It could be:
- An individual or solopreneur who has built the app all on their own.
- A company whose main focus is solving the problem.
- A bigger company that builds all kinds of apps to solve different problems.
Search through the app marketplace. Google up the companies that have published the competing apps. Try to figure out whether they are freelancers, small businesses, or bigger enterprises.
The goal of this step is to see who you are against.
If it’s a big company, chances are they have entire marketing teams and developer teams working on the problem. Competing alone against this type of player is difficult.
On the other hand, this suggests there is demand and money to be made.
I don’t say it’s bad to compete against big players. But building a better app alone than a company with dozens of employees is impossible. Due to the lack of resources, you will end up doing everything worse than they.
In this case, it’s wiser not to build your app to match the competitor’s app feature by feature. Instead, try to think of a unique angle to attack with. This could be something useful that the big company doesn’t do that well.
Of course, sometimes it makes sense to go big. If the market research shows there’s potential, you could build a startup, raise funding, and start growing fast. This is how most big companies start too.
5. When Was the App Last Updated
There is no such thing as a “ready app”. App development is a continuous process. Your app needs to solve customers’ problems. This means continuous iterations and improvements. Once you stop updating the app, you can say goodbye to the business side of it.
At this point, it’s time to check how your competitors are doing this.
If a competing app hasn’t been updated for a while, it could mean:
- There is simply no demand and no reason to keep updating the app. This is something you don’t hope to see because it can spell the same fate for you.
- There might be room for you to take the competitors’ spot. Sometimes there is a great app, but the author stops committing to it for one reason or another. This can offer you an opportunity to take their spot.
On the other hand, if the competing apps are updated frequently:
- It suggests that competing apps are still relevant and have demand in the market.
- On the flip side, this means you are going to have active competitors to play against.
6. Read and Analyze Reviews and Ratings
The app reviews and ratings give you great free insights into your competitors’ app game.
If the app has poor ratings, try to figure out why. Doe the app lack features? Or is the app completely broken? Does the app fail to solve the key problem altogether?
With free insights like this, you can avoid these pitfalls in your app.
If the competitor has great ratings and reviews, make sure to try the app yourself. Use it for a while and pay attention to the UX and the features. Also, take a look at the user reviews to see what makes them like the app so much.
This data can lead you to make better decisions when planning, designing, and implementing your app.
Remember, this is free data someone has worked hard for! Instead of doing the same mistakes as your competitors, you can learn from them before writing a single line of code.
As you can tell, you will gain valuable insight from reviews and ratings. With bad reviews, you know what to avoid. With good reviews, you know what is appreciated. This is a tremendous help to your app development process.
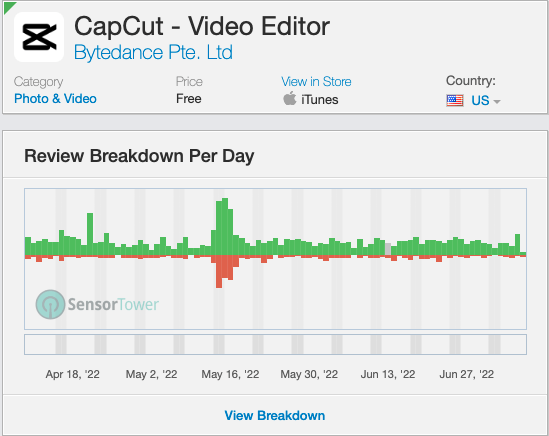
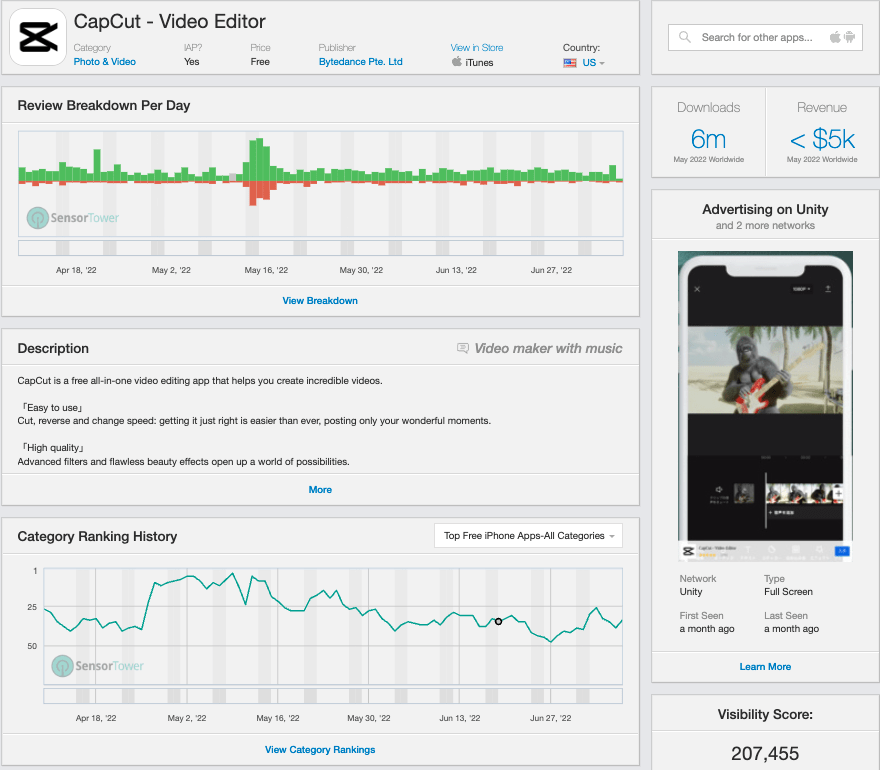
7. How Many Downloads?
You cannot find the number of downloads an app has on the App Store. Instead, you need to use third-party software that specializes in estimating this number.
One example of such an app is SensorTower. You can use the tool for free to analyze your competitor app’s success on the App Store.
As an example, here you can see the metrics of a popular video-editing app CapCut.
8. Final Verdict: Smash or Pass
The main goal of the competition and market research phase is to help you validate your app idea.
If there is no competition for your idea, chances are the idea isn’t viable. There have likely been apps that have tried to solve your problem before and failed miserably.
A much less likely scenario for the lack of competition is that no one has thought about the idea. It’s almost never the case. Unless there is a completely new trend or movement, it’s really unlikely you are the first one with the idea.
So don’t expect to come up with something completely new. Just make sure your problem is worth solving and that it’s important for other people. Besides, make sure there is not too much competition.
If you choose to roll with your idea based on your research, that’s awesome! But if the idea is not worth implementing, that’s ok too. It’s better to not create an app for the sake of creating apps. Always try to solve a real problem instead!
Once you have validated your app idea, it’s time to learn how to pitch it. You never know when need to explain your app idea to somebody such as investors, colleagues, or friends and family.
By the way, the speech offers a chance to narrow down the scope of your app. This is because an app idea isn’t good if you cannot describe it in one sentence.
Create a 30-second elevator pitch about your problem and the proposed solution. If you cannot fit your idea into a 30-second speech, you are biting off way more than you can chew.
Make sure anyone can understand your pitch. It would be a shame to lose opportunities only because they don’t get it. Don’t forget to ask for feedback on your pitch from your friends!
Once you have researched and validated your app idea, it’s time to move on to planning the features!
Step 3. Choose the Features of the App
Now that you have validated your app idea, it’s time to start planning the features to it.
It’s time for some imagination and creativity.
Think about the app of your dreams. What features would make this app perfect? Forget about the implementation details and let your imagination fly.
Naturally, the vision and features will change over time. Especially when you start testing and gaining feedback, changes are inevitable. But for the time being, there are no limits.
Write down all the features you think your app needs to have.
And don’t think about monetization yet. Even though it’s an important part of the app business, getting test users is much more important at this point.
So for example, if you are building a fitness app for weight loss, here are some core features:
- Create an account by:
- Using an email and password
- Authenticate via Google or Facebook
- Set up a profile
- Set a goal for weight loss in a specific time frame
- Pick a weight loss workout program and follow it in the app
- Choose a diet and update a dietary calendar on the app
- See how to perform the required exercises
- Get notified for skipping workouts
- Track progress (weight loss, BMI development, number of workouts)
- Share progress on social media
Choose the Main Features for an MVP
MVP or Minimum Viable Product enforces the idea of launching a small but useful version of your service.
The MVP ideology applies to all businesses, not just apps.
Imagine spending a year or two building an app no one (except you) has tested before. Without customers’ feedback and iteration, there is a 99.9% chance the users won’t like the app. The app might be completely useless, despite the market research effort you did in advance.
The idea of MVP is to help you get user feedback as quickly as possible. The feedback guides you toward the right decisions and understanding of what users actually want.
At this stage, you may get surprisingly good suggestions, or even completely new ideas. No matter what you do, always listen to the feedback. At the end of the day, you are solving your customer’s problems. If you don’t hear them, you are not much of a help to them.
In the MVP phase, the idea is to launch a cycle, where you:
- Release an MVP of your app to your target customers.
- Ask for feedback.
- Make feedback-based updates to the MVP.
- Ask for feedback on the updates.
- Repeat until the MVP has turned into a perfect fit for the customers.
This might mean a lot of iterations and customer-surveying.
To build a successful MVP, take a look at the list of all the features you listed for the app of your dreams. Leave out all the features that are not in a key role in solving the customers’ problems. Only choose the most important features that are necessary to demo your app.
To build an MVP, you should spend as little time as possible. To efficiently build MVPs, you can try no-code or low-code solutions.
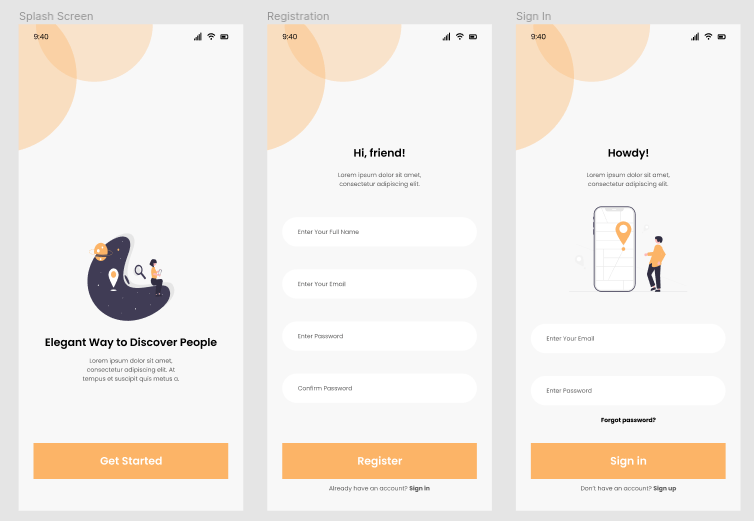
Step 4. Build Design Mockups

It is time to start taking steps toward building the first MVP version of your app.
As the first step, your goal is to create an intuitive and user-friendly design for the app.
At this stage, you should think about how the users see and interact with the app and its features.
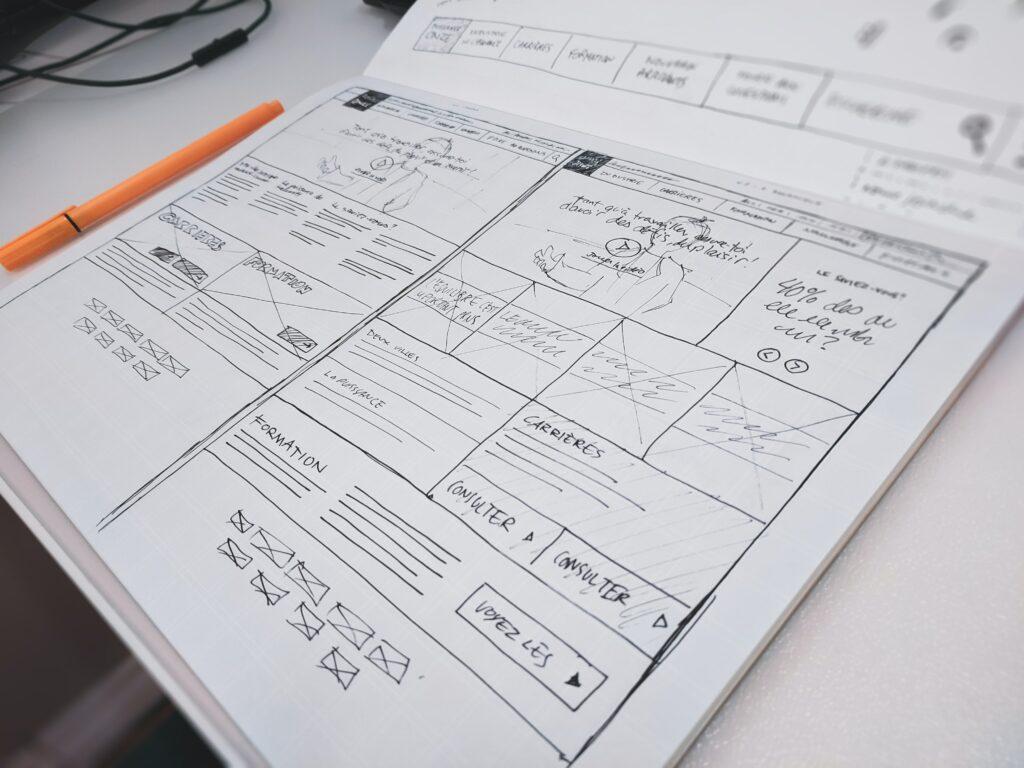
The fastest way to get your initial ideas out is by drawing them on a physical piece of paper.
Grab a pen and paper and start drawing your design ideas. You can juggle a couple of design ideas. Don’t spend time making them look great. These are meant to be rough drafts that help you better visualize the app’s outlook characteristics.
Choose Main Screens
Imagine yourself using the app. Then try to think about different views that make up the app.
For example, if you have a business app, you might have:
- Login and signup view
- Profile view
- Goals and progress view
- Diet view
- Training view
Don’t overthink this part. There is no chance for you to nail it on the first try anyway. You can always make changes as you design the app.
In-App Navigation
Once you have split your app into different views and sections, it’s time to consider how users are going to navigate the app.
The commonly used navigation mechanisms for apps are:
- Hamburger menu
- Bottom navigation
- Top navigation
- Gesture-based navigation
- Tabs
- Cards
Your goal is to the navigation easy and enjoyable for the user. The best way to go about making the decision about navigation is by looking at what others do. Open up some of your favorite apps, and pay attention to the navigation in them.
Successful navigation flows seamlessly and is intuitive. If a user has to think about how to find something, that’s problematic. A great user experience is lightweight for the user. The user should not have to solve problems to use your app. Unintuitive navigation drives your users away from your app.
Feel free to read more about different types of mobile app navigations.
Focus on UX
UX or User Experience is a study of how a user feels when they are using your app.
As a matter of fact, UX is not only an app thing. It’s relevant to all areas of product development. UX is broad concept and you can even educate yourself to become a UX expert.
Mobile app development companies typically have professional UI/UX experts to make sure the app is user-friendly.
The UX can make or break the app. Make sure to get the basics right off the bat. Great UX is all about how easy and intuitive it is to use the app.
To make the UX better, you need to cleverly think about what elements to present on which screen. Furthermore, focus on how to arrange the elements for maximizing usability. The simpler, the better.
Here are some examples of things that impact UX.
Think about reading an e-book on your smartphone. When you open a new page, there is a quick animation reminiscent of sliding a physical page. A small delicacy like this makes using the app intuitive.
But it’s also easy to blow it!
Think about tapping a button and seeing a two-second animation that morphs the button before the action. This negatively affects the UX! The animation is blocking actions for two entire seconds. Because the animation has no positive contribution to accomplishing the task, it should not be there.
If something doesn’t contribute to making the app easier or quicker to use, don’t add it there!
When thinking about the UX, don’t forget the physical usage either. For example, imagine holding a device and not being able to reach a button with your thumb. This is bad UX as well.
It’s the small delicacies that add up when it comes to UX.
Naturally, it would be impossible to create an app with a perfect UX. There is always something some bad UX in every app. Anyway, it’s easy to do optimizations to make the UX as good as possible.
If you (or no one in your team) has UX design skills, start by reading Apple Human Interface Guidelines. This is a comprehensive list of what makes a good app UX. As a beginner, the safest bet is to follow the UX best practices. Don’t try to get too clever.
Remember, you are working on the first version of your app. It’s impossible to nail it on the first try. Thanks to the user feedback, you will receive insights as to what’s working and what is not.
Onboarding Guide
Don’t forget about adding an onboarding guide to your app.
When it’s the first time using the app, users commonly need some assistance.
Add a simple few-steps onboarding guide on the notable features of the app. Present the onboarding guide to first-time users only.
Remember to strip the bells and whistles for the onboarding guide. Try to keep it as simple and short as possible. A lengthy and unclear onboarding guide negatively affects the UX of your app. It can even drive some users away.
Mobile App Design and Prototyping Tools
You can sketch your app designs with pen and paper. This is the good old way that is efficient and easy.
But before you do that, it’s good to know there are tools created for designing and prototyping mobile apps. I’m not saying you should use those tools, but they offer a nice alternative to pen and paper.
Here are two great free tools I love to use:
Sketch
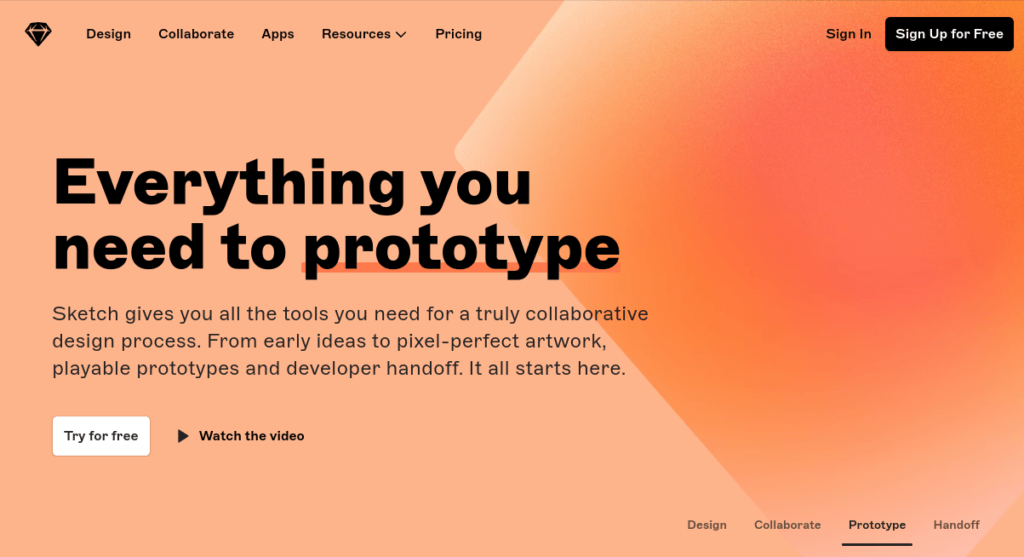
For the past couple of years, Sketch has become the de-facto tool for mobile app design.
Sketch is a well-rounded vector-based tool. This means you can scale your artwork up and down without losing any level of detail. Working with vector art is useful when dealing with different screen sizes, for example.
The only limitation to Sketch is it’s a macOS-only tool.
Figma
Figma is another, basically equally as good of a design tool as Sketch.
As opposed to Sketch, Figma has both a downloadable tool as well as an online editor. The online editor works across all the operating systems, so you are not limited to working with macOS only.
Figma also focuses on team collaboration. There are great collaboration features that make it possible for you to work with the app designs as a team.
For an individual user, Figma is completely free. To add multiple designers to the same project, you have to subscribe to a paid plan.
I recommend testing Figma or Sketch! They are super easy to get started with and you don’t need to pay for using them.
🎨 Need a more thorough guide to design tools for app development? Read my comprehensive list of Best Mobile App Design Tools.
Step 5. Implement the Design
When the mockups are ready, it’s time to create the actual design of your app.
During this process, you put together the exact outlook of your app. This is an important step for multiple reasons:
- You have laid an outlook foundation for the developers to build the app on. Even if you are the developer of the app, you still need to create the designs first. Designing while coding is a very bad idea.
- You can use the designs of your app in presentations. For example, if you get a chance to pitch the app to an investor or a potential co-founder, it’s good to have something concrete to show.
Before designing, take a moment to consider how crucial role a sleek user interface plays for the app to become successful. Most of the time if not always, it’s a must to have a professional-looking UI. If this applies to your app, the best bet is to get help from a professional designer instead of doing it yourself.
Without any design experience, your app will end up looking bad—even if it doesn’t look bad in your eyes. We all have used those kinds of apps where the creators have skipped the design part. You don’t even have to log in to such an app to tell it looks unprofessional.
So pay attention to the design of your app. Here are some options for putting the design together:
- Hire a professional designer. You can find freelance designers on Fiverr, for example. Alternatively, you can scroll through Dribbble designs to find one that meets your eye. Then you can check their profile to see whether they are available for hire.
- Use pre-built app templates. This is the easiest and most cost-efficient way. There are sites and design tools that have pre-built templates you can use. You can then add some customizations to these templates to make them look your own. Alternatively, you can pay for someone to give them the final touch. The big issue with templates is that your app ends up looking like some existing ones.
- Look for a design-oriented partner. Try to find a design-oriented partner. Think about your friends. Does anyone of them know how to design? Or do their friends know the design game? You can also attend meetups.
- Learn graphic design. This is the most time-consuming way. If none of the previously mentioned options sound appealing to you, do it yourself! But keep in mind it’s not a walk in a park. It’s going to take quite a while before you can create something beautiful. Consider taking one of the graphic design courses.
A freelancer is not part of your mission. Thus, they don’t know you or your goals. The outcome does not impact their life as much as it impacts yours.
Take your time to explain your mission and all the essential details you want in the app.
Once your app has a professional design, it’s up to you in which order you want to take the next steps:
- Build the app first.
- Create your app marketing plan first.
I’ve added creating the marketing plan before the app creation phase. But feel free to swap the order if you want to.
Step 6. Create a Marketing Plan for Your App
There are millions of apps out there. As discussed earlier, chances are there are many similar apps to yours too! You need to put effort to get your app in front of your target audience.
These days, more and more app businesses market the app even before the launch. One great example is to create a pre-launch email list where people can join. Another common way to promote your app is by relying on paid marketing.
One of the most misleading phrases you’ll ever hear is “If you build it, they will come”.
Unfortunately, this is so far from reality.
No matter how good an app you create, if you don’t strategically promote it, nobody will discover it. And no, I’m not talking about a couple of LinkedIn posts or Twitter shares. You need to promote the heck out of your app. So much so that you need a clear plan on how to do that.
To create a plan, you need to consider all the marketing options you have. Here is a quick list of both pre and post-launch marketing strategies.
Pre-Launch Marketing Strategies
Before launching your app, there are lots of marketing activities you can already practice.
1. Create a Pre-Launch Email List
Create a list of emails of people interested in your app.
If you don’t do this, make sure to at least create a landing page for your app. This way there is a clear place for potential users to find out more about you and your mission. Include a call-to-action on your landing page to join your pre-launch mailing list.
To build the mailing list, you can use a free tool like MailChimp. This service allows for creating a mailing list of 1000 contacts for free.
But how about the landing page? There are great tools for creating a decent-looking landing page in a matter of minutes. For example, you can use Wix, MailChimp, or even Medium.com. No, it doesn’t involve coding. Instead, you can use pre-built templates and drag-and-drop editing.
You don’t need to worry about the uniqueness of the landing page. Once your app gains more traction, you can pay for a professional to build a real website for the app.
2. Build a Media Kit for your app
A media kit? Never heard of such before, huh!
The media kit is a compact package of your app. It includes your app’s logos and information. Journalists, bloggers, and other people can use the media kit to write about your app.
You can create a simple shareable Google Drive folder for the Media Kit.
Include a link to your media kit on your landing page.
3. Familiarize yourself with App Store Optimization (ASO)
When you publish your app, you don’t just throw it into the app marketplace. Instead, you need to fill in all sorts of information in the app. Pay attention to:
- App name
- Title
- Subtitle
- Keywords
- Description
- Screenshots and videos of the functionality
- Ratings and reviews
I highly recommend reading a complete ASO guide before implementing the strategies.
4. Share Your Journey

People are interested in what you do.
You can share your journey publicly on social media or on a blog. It doesn’t matter what your role is in the project. People are still eager to learn how it’s done.
The best part is this phase is completely free and organic. You don’t need to pay for an extra service. All you need to do is dedicate some time to documenting the progress and key learnings.
You can share these stories on your social media. Alternatively, you can create a blog section of your app and share the journey there.
This way you’ll rack up readers that support you right off the get-go. Once the app goes live, they are the first ones to download it and give valuable feedback.
Post-Launch Marketing Strategies
After launching the app, it’s important to market the app through the roofs. Here are some ideas on how to do it.
1. Email Your Pre-Launch Email List
After launching the app, you can happily notify the email list that the app is now live!
2. Spread the Word—But Don’t Spam!
There are tons of social platforms with millions of people. Go ahead and find all the forums, groups, pages, and platforms where your app could be of great interest.
Here are some ideas:
- LinkedIn groups
- Quora spaces
- Medium.com publications
- Reddit threads
- Facebook groups
- Youtube videos
- TikTok and Instagram hashtags
But don’t forget your mission! Your goal is to help people with your app. This is no exception in the promotion of the app. Your goal is to spread the word to people who could truly find the app useful.
If you just create accounts on the aforementioned social channels and start promoting, you’ll end up being banned in no time.
Instead, create valuable content and add useful comments. As a part of it, suggest using your brand new app. But be subtle. Don’t force it on people!
3. Think about Paid Marketing
If you have some extra budget, consider paid marketing. This can give a nice initial kick to your app.
There are many types of paid marketing options to choose from. These include:
- Facebook Ads
- App Store Search Ads
- Google Ads
- Influencer Marketing
- Promoted Tweets
- CPI Ad Platforms
I don’t mean you should try each and every one of these paid channels. But do some research and try some of them!
Now you have a better understanding of the types of marketing strategies you can use.
Do some research and create a plan for marketing your app. When the execution of the strategies becomes relevant, you have a document that is easy to follow.
And don’t forget about the pre-launch marketing. You should probably start it already!
Finally, it’s time to move on to building the actual app.
Step 7. Build the App

It’s time to create the actual app!
As you guessed, this is the part that requires coding. Usually, this doesn’t mean you have to code the app yourself. Instead, you can outsource the coding process to someone who has done it before.
There are multiple options to choose from.
- Hire a freelancer. If coding is not your thing and you want to focus on the business, don’t waste time learning how to code. Instead, you can hire a freelancer to develop your app. For example, you can find great talent on sites like Fiverr or Upwork.
- Hire an app developing company. A more expensive outsourcing approach is to hire a company to develop your app. In addition to the app, you get consulting and project management services too. When working with a freelancer, you are the one who gives direction. But with a professional app-building company, you can ask for direction.
- Partner with a software developer. Partnering with a developer is a great option for building an app. But to get someone on board to write code, you need to have a convincing record of building businesses in the past. There are so many founders looking for technical partners that you have to be able to stand out! Otherwise, no one is willing to embark on the journey with you.
- Use a no-code tool. The previous options included getting someone to build the app for you. But if none of the options are possible, you can always take a shortcut and use an app-builder to build the app yourself. There are lots of no-code tools for building all kinds of applications. You can find awesome tools for building mobile apps too. As a drawback, the customizability is limited with the no-code app builders. But if your app’s first version can be built with a no-code tool, then you should definitely go for it!
- Purchase an app template. There are entire marketplaces for buying and selling templates for apps. One such example is CodeCanyon. If you can find a template that matches what you are building, consider buying it. But remember that the pre-built template always needs customization. First of all, you need to customize it to follow your designs and such. Secondly, there are certain features that are missing. Thus, you need to hire a freelancer to add the missing building blocks.
- Learn how to code and build it yourself. Last but not least, you can always take the hardest route and learn how to code yourself. But be prepared! It will take a really long time before you can write your own apps. To move fast, this is the least favorable option. But if you are into the coding side of things, then you should definitely develop your own app. Here is a list of great iOS Development Courses.
Also, keep in mind you (or the person developing the app) must code separate versions for each app marketplace. This is pretty much double work.
If you use a no-code solution, chances are you can submit the same app to all the different marketplaces.
Also, the developer might choose to use a framework, such as React Native, to build the app for both platforms simultaneously.
There are some pros and cons for building separate native apps vs building a cross-platform app with one tool.
Step 8. Submit to the App Store
When the app is ready, it’s time to go live!
Unfortunately, this step is commonly easier said than done.
For example, Apple App Store is really picky when it comes to accepting apps. They want to make sure your app is not too identical to an existing one. Besides, the app must meet UI/UX criteria. And last but not least, the app must not cause any harm to the user.
Even though all of this sounds obvious, there is a great chance for new apps to be rejected. Especially if they are coded by someone who has never coded before.
Here is the publication process of an iOS app:
0. Create a Developer Account
Before you can submit the app to App Store, you need to create a developer account.
This costs around $100 per year per user.
Without a paid iOS developer account, you cannot submit apps to the App Store.
1. Ensure the app quality
Read carefully the App Store Guidelines. Make the necessary fixes, if any.
2. Specify your app’s metadata
To get your app into the App Store, visit App Store Connect.
This is the site via which you create an App Store project for the app.
You are requested to specify all the details of the app, such as the title, description, screenshots, and screen videos.
3. Upload to App Store Connect
If you are using Xcode, you can do the upload the app from there.
If you use a no-code app builder, it might have native app publishing features integrated.
Anyway, in this step, you send the app under the app listing created in the previous step.
4. Leave reviewer notes and submit
After shipping the code to App Store Connect, it’s time to send the app project for review.
Before you do that, leave as thorough notes for the reviewer as possible. This streamlines up the review process. After leaving great notes, you can finally send your app for a review.
5. Wait, wait, and wait
It can take hours, it can take days, and it can take weeks. Someone in the Apple Certification Team is going to perform a thorough review of your app.
Yes, there is an actual person that does it!
Their job is to make sure your app meets all Apple’s guidelines. The review time depends on multiple factors. To speed up the process, you should leave good reviewer notes.
6. Get approved (or rejected)
Usually, it takes 24-72 hours for someone to review your app.
After the review, you are either approved or rejected. If it’s a rejection, don’t panic. You can just make the suggested fixes, and resubmit the app. This happens to everyone.
On the other hand, if you just got accepted, it’s time to party!
This is the iOS submission process. To submit your app to other app marketplaces, you need to follow a similar procedure.
Step 9. Market Your App Through the Roof

Now that you’ve gone live, it’s time to execute the marketing plan.
Depending on how good a job you did in the planning phase, this step should be easy to get started with.
To recap, at this stage, you should:
- Email your pre-launch marketing list
- Run paid marketing
- Consider influencer marketing
- Continue with Apple Store Optimization
Keep in mind that if you build it, they won’t come! You need to effort in marketing the app.
One of the best things that could happen for your app is to get featured in Apple App Store. That being said, there is no way to control it. However, if your app meets the demand, looks great, and Apple likes it, there is a small chance to be featured.
Make sure to draw as much attention as possible. And never be pushy! Try to suggest the app for people that are looking for a solution to the problem the app solves.
Step 10. Iterate Your App with User Feedback

A mobile app is never “ready”! Instead, it’s an ongoing process. It’s a cycle between you and your users.
Your users have a problem. Your app solves their problem.
The only way to know how your app is solving the problem is by reading and reacting to user feedback.
If there is a feature many users are missing, or if there are issues many users are reporting, it’s time to make an improvement. This is called iteration.
Think about your favorite apps. They are likely updated at least on a weekly basis.
To make a successful mobile app business, you need to work closely with your customers. Make sure leaving reviews and feedback is easy. Comment on the feedback. Analyze the feedback and reviews. Make decisions.
If you think the app is great but the customers don’t, you are deemed to fail.
The process goes as follows:
- You release the first MVP version of the app.
- The customers try it.
- The customers give feedback.
- You react to the feedback by creating a new feature/version of the app.
- Repeat forever.
Never take the feedback personally. Be grateful you get valuable business advice for free. The customer is always right. This is generic but so true!
So keep on iterating.
This completes the comprehensive guide on how to create an app. If this is what you came for, then thanks for reading!
If you have some burning questions or doubts, feel free to read to the end. I’m going to make a couple of points. Besides, I will answer some commonly asked questions.
Don’t Take Shortcuts
Thus far you have learned how big a process it is to build apps.
Now you may wonder if there was a shortcut.
For example, did you know that the developer of Flappy Bird claimed to make $50,000 every day? Furthermore, the project only took the creator a day or two to create. Although there are no official reports, based on the hype and the simplicity it had, those numbers must be close to the truth.
So why should you take the hard route if there are shortcuts?
Because there are no shortcuts.
Building a successful business requires years of full commitment—unless you are super lucky.
Flappy Bird was a one-of-a-kind lucky developer. Out of the 6 million apps published to the app marketplaces, I have never heard of a similar story. I’m not taking anything away from the Flappy Bird developer, I think the idea was awesome and he nailed it. But there are zillions of similar apps that never made it.
If you take a shortcut or rely too much on luck, you will fail—even if you published 1,000 apps with this mindset.
Perform every step presented in this guide, and you will get close. You are still going to fail many times. But this is the optimal route to take. If there was an easy way, why wouldn’t everyone do it?
Don’t be afraid of failure. Most of the carefully planned, designed, and implemented apps never become successful. That’s a risk you have to be able to manage.
If you do things right many times, there is a great chance for success.
FAQ

Do you need to know how to code to build apps?
If you want to write code, then yes! But it’s not mandatory for a person to have the technical background to create a tech business. This applies to mobile apps.
Mobile app development is not about writing code. Instead, it’s a full-on product development business.
A successful mobile app solves a customer’s problem. To do this, you need much more than coding skills. As you learned in this guide, you need to be good at:
- Validating ideas
- Conducting research
- Marketing
- Talking to investors
- Coding
Usually, there are dedicated people that are experts in these particular areas. If you are on your own, you need to handle all these aspects. If you do it well enough, you’ll be able to raise funds and hire a team of experts around you quickly.
How long does it take to create an app?
This is a good question when considering building an app.
Creating an app is an ongoing process. The app is never “ready”. In this sense, it takes forever to create one.
But if the question is how long it takes to turn an idea into a published app, then there could be a definitive answer.
But unfortunately, it’s still like asking “how long is a piece of string?”.
Building a generic app, such as a chat or online store can happen in a breeze. If you use a no-code tool, chances are you don’t have to spend more than a couple of hours.
To write code to create an app takes significantly longer. Some very basic game apps can be created over the weekend.
Learning how to code apps takes hundreds of hours. If you want to code an app without coding experience, be prepared to spend months and work hard every day.
Also, more complex app projects can take months or even years to build. By the way, in this case, you need to make sure there is demand for the app. Never develop in a vacuum! If you cannot code an MVP quickly, you can always build a prototype and get it in front of your users.
Keep in mind creating the first MVP version of your app should not take long! Your goal is to be able to get users and feedback quickly.
What is Swift?
Swift is the iOS app development programming language.
If you want to build native iOS apps, you need to learn Swift.
If you are looking to build Android apps, you need to learn Java or Kotlin.
Should I learn to code to build an app business?
It’s up to you. You don’t need to know how to code to create an app business.
If coding is of interest to you, go ahead! Or if you know how to code, to begin with, then why not contribute to the MVP of your app?
But as your app business grows, you will eventually need to hire other developers to form a development team. It’s simply not possible to keep up with the competition by working as a solopreneur and writing all your code.
If you are the one running the business, you will code less and less the more developers you hire. After a while, there is no code written by you in the app.
So even if you coded the first version of your app, chances are your code will be replaced by someone else’s.
Wrap Up
Today you learned the complete process of building a successful app business.
To recap, building a successful mobile app is not about coding or creating cool designs. These two are in a key role, but there is a ton of other things to worry about before.
Due to the complexity of the app development process, it doesn’t even matter if you can code or not. If you have coding skills, you can always hire someone. These days, you can even use no-code or low-code solutions to build apps.
The more important part of the app development process is to identify and solve customers’ problems.
Building a successful app is like building any other business. To create an app, you need to:
- Propose a solution to an everyday problem important to you.
- Do extensive market and competition research.
- Plan the important features of your app.
- Create and iterate with MVP using real customer feedback and data.
- Design the app.
- Create a prototype of your app.
- Code the app based on designs, prototypes, and user feedback.
- Market through the roof.
- Create a forever-lasting feedback loop between you and the customers.
One thing many people get wrong is the “readiness” of the app. A successful app is never “ready” so to speak. Instead, it’s an ongoing cycle of asking what users want and then implementing it.
If you publish an app to never touch it again, you can blow a kiss goodbye to your business too!
When your app gets some hype, you can take it to the next level by raising funding and starting the rigorous hiring process.
Remember, it’s up to you how serious you want to be with your app.
You can create a simple app or game over a weekend by yourself. But keep in mind these types of side projects don’t make any money.
If you want to create apps to make a living, you need to take a more serious route.
Thanks for reading.
I wish you the best of luck with your journey as a mobile app business person!